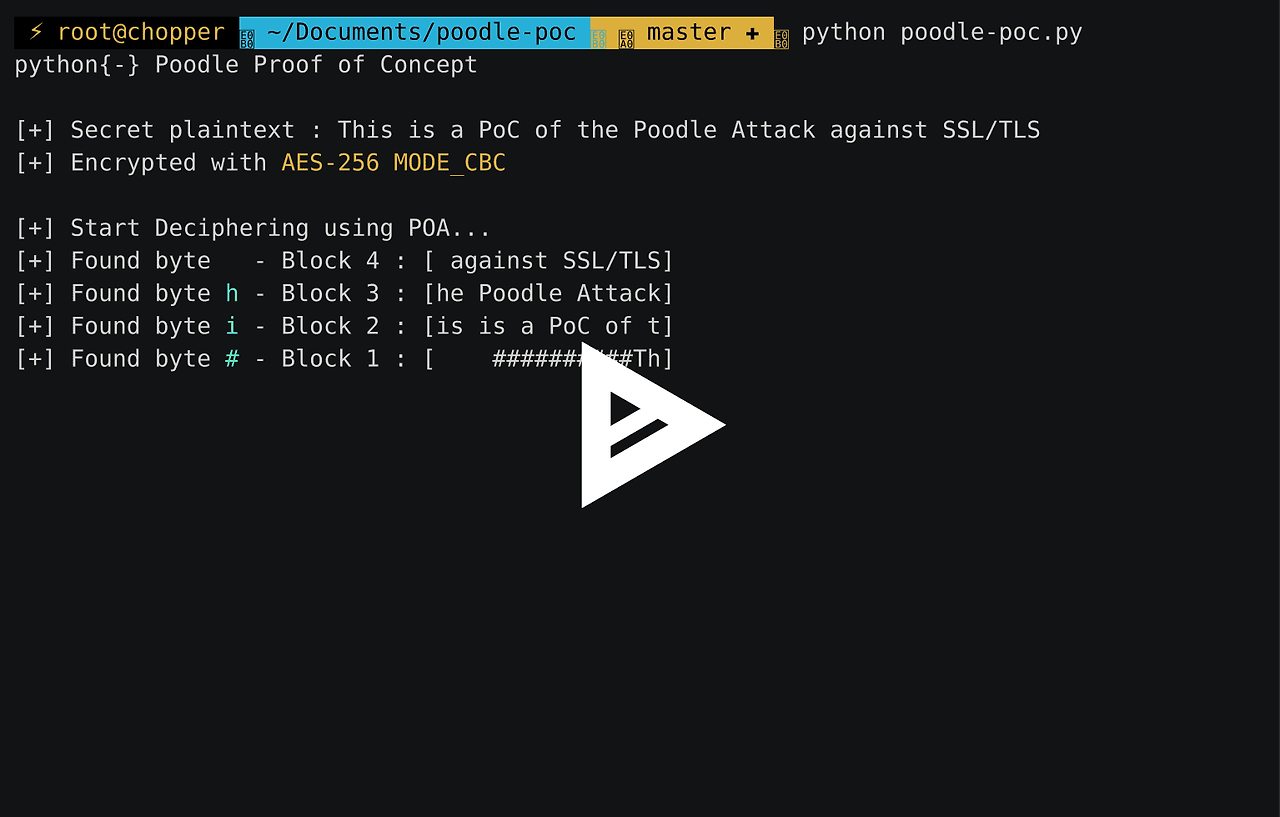
A proof of concept of the Poodle Attack (Padding Oracle On Downgraded Legacy Encryption) :
a man-in-the-middle exploit which takes advantage of Internet and security software clients' fallback to SSL 3.0
The Poodle attack allow you to retrieve encrypted data send by a client to a server if the Transport Layer Security used is SSLv3. It does not allow you to retrieve the private key used to encrypt the request.
1. 🐩 Concept of the attack 🐩
SSLv3 and CBC cipher mode
SSLv3 is a protocol to encrypt/decrypt and secure your data. In our case, he uses theCBC cipher mode chainning. The plaintext is divided into block regarding the encryption alogithm (AES,DES, 3DES) and the length is a mulitple of 8 or 16. If the plaintext don't fill the length, apaddingis added at the end to complete the missing space. I strongly advice you to open this images ofencryptionanddecryptionto read this readme.
A request send over HTTPS using SSLv3 will be ciphered with AES/DES and the mode CBC. The particularity of SSlv3 over TLS1.x is the padding. In SSLv3 the padding is fill with random bytes except the last byte equal to the length of the padding.
Example:
T|E|X|T|0xab|0x10|0x02where0xab|0x10|0x02is the padding. T|E|X|T|E|0x5c|0x01where0x5c|0x01is the padding.
Also the last block can be fill with a full block of padding meaning the last block can be full a random byte except the last byte.
T|E|X|T|E|0x5c|0x01|0x3c|0x09|0x5d|0x08|0x04|0x07where|0x5c|0x01|0x3c|0x09|0x5d|0x08|0x04|0x07is the padding on only the0x07is know by the attacker. So if an attacker is able to influence the padding block, he will be able to know that the last byte of the last block is equal to the length of a block.
Influence the padding
An attacker must be able to make the victim send requests (using javascript by exploiting an XSS for example). Then he can control the path and the data of each request:
Example: adding "A" byte to the path of the request
GET / HTTP/1.1\r\nSECRET COOKIE\r\n\r\n
GET /AAA HTTP/1.1\r\nSECRET COOKIE\r\n\r\nDATA
With this technique he can influence the padding.
HMAC
SSLv3 also useHMACto check the integrity and authenticate of the plaintext.
keyed-hash message authentication code (HMAC) is a specific type of message authentication code (MAC) involving a cryptographic hash function (hence the 'H') in combination with a secret cryptographic key
With this an attacker can't intercept and alter the request then send it back. If the server encounter a problem, he will send an HMAC error.
MAC-then-encrypt
The protocl SSLv3 use the following routine: he receives the data from the client, decrypt the data, check the integrity with the HMAC.
MAC-then-Encrypt: Does not provide any integrity on the ciphertext, since we have no way of knowing until we decrypt the message whether it was indeed authentic or spoofed. Plaintext integrity. If the cipher scheme is malleable it may be possible to alter the message to appear valid and have a valid MAC. This is a theoretical point, of course, since practically speaking the MAC secret > should provide protection. Here, the MAC cannot provide any information on the plaintext either, since it is encrypted.
This mean that we can alter the ciphered text without the server knowing it. this is great, really :)
2. 🔑 Cryptography 🔑
First the last block need to be full of padding, like we see previously the attacker use path of the request and check the length of the request.
He saves the length of the original cipher
He adds one byte in the path and check the length.
If the length doesn't change he adds another byte etc.
Else : the length of the cipher request change, he knows the last block is full of padding.
Since the last block except the last byte is full of random bytes he can replace this last block Cnby the block he wants to decrypt Ci. The altered request is send to the server.
The server :
remove the padding regarding the length of the last byte
get the hmac from the request = HMAC
get the plaintext
compare hmac(plaintext) and HMAC
if equal => good padding
else => bad padding
By replacing the last block the attacker also changes the the last byte of the last block (the length of the padding). There is 1/256 the last byte replace in the padding block is the same than the orginal, in this case there will be no padding error and the attacker can use this XOR operation to retrieve the last byte of the block Ciby following this operation :
The last byte of the block can be retrieve Pi[7] = Ci-1[7] ⊕ xxxxxxx7 ⊕ Cn-1[7] In case of padding the attacker need to close the SSL session to make another handshake (new AES key) and get new cipher then replace the last block etc. (generaly +300 handshake needed)
Once one byte is retrieve he will get all the other byte of the block by adding a byte in the path and remove one byte in the data :
Request to retrieve byte E,I,K,O
GET /a SECRET_COOKIE dataazerty PADDING_7
GET /aa SECRET_COOKIE dataazert PADDING_7
GET /aaa SECRET_COOKIE dataazer PADDING_7
GET /aaaa SECRET_COOKIE dataaze PADDING_7
About TLS1.0
Even though TLS specifications require servers to check the padding, some implementations fail to validate it properly, which makes some servers vulnerable to POODLE even if they disable SSL 3.0
TLS is normaly safe against Poodle, but some implementations don't check the padding, it's like if we used SSLv3, this is why some TLS version are vulnerable.
3. 💥 Start the attack 💥
There is three files in this repository:
poodle-poc.py -> A Proof Of Concept that doesn't require any prerequise
parallelization-poodle.py -> ANother Proof Of Concept but using parallelization (really fast)
poodle-exploit.py -> An exploit for real-case scenario
1. The poodle-poc.py file
This poc explore the cryptography behind the attack. This file allow us to understand how the attack works in a simple way.
python3 poodle-poc.py
2. The poodle-poc.py file
The fileparallelization-poodle.pyis a project, and idea :) check#1
python3 parallelization-poodle.py
3. The poodle-exploit.py file
This is the real exploit. Really usefull with you want to make a proof a concept about the Poodle Attack for a client during a pentest if he used old server and browser. Just put the ip of your malicious proxy into the config browser with the correct port, the proxy will take care of the rest.
Requirement:
make sure the client and the browser can communicate with the protocol SSLv3only, force only SSLv3 in firefox usingsecurity.tls.version.min: 0for example. Alternatively, if the client also use TLS you can force the downgrade
make sure the server is vulnerable, use the tooltestssl.sh
make sure you can inject Javascript on the client side (XSS)
make sure you can intercept the connection between the client and the server
💀If you have these prerequisites you can start the attack💀:
Tow options ara available for this exploit:
Setup the IP adress and the port of the proxy directly on the client side and run the exploit ( go to the part 3)
Setup an ARP spoofing attack to redirect all the traffic between the client and the server on your machine
Enable the forwarding and set an Iptable rule to redirect the traffic from the client to your proxy
Use the toolarpspoof,ettercaporbettercapto run an ARP spoofing attack
$> bettercap -iface vmnet1
net.show
set arp.spoof.internal true
arp.spoof on
Run the proxy
⋊> ~/T/poodle-Poc on master ⨯ python3 poodle-exploit.py -h              13:10:24
usage: poodle-exploit.py [-h] [--start-block START_BLOCK]
                         [--stop-block STOP_BLOCK] [--simpleProxy SIMPLEPROXY]
                         proxy port server rport

Poodle Exploit by @mpgn_x64

positional arguments:
  proxy                 ip of the proxy
  port                  port of the proxy
  server                ip of the remote server
  rport                 port of the remote server

optional arguments:
  -h, --help            show this help message and exit
  --start-block START_BLOCK
                        start the attack at this block
  --stop-block STOP_BLOCK
                        stop the attack at this block
  --simpleProxy SIMPLEPROXY
                        Direct proxy, no ARP spoofing attack

$> python3 poodle-exploit.py 192.168.13.1 4443 192.168.13.133 443 --start-block 46 --stop-block 50
Choosing a block: if you don't specify the block option, all the block will be decrypted but this can take a long time. I strongly advise you 'know' how the request will be formated and use the scriptrequest-splitter.pyto know the block you want to decrypt (idealy the cookie block ! :)
Then insert the javascript malicious code (poodle.js) into the vulnerable website using an XSS for example. Launch the python script and typehelp, thensearch, and finalyactive. During that time, only two interactions with the javascript will be needed (search and active command).
Update 01/04/2018: downgrade option has been added to the exploit. When the exploit detect the TLS protocol, enter the commanddowngradeto downgrade to SSLv3.0.
How it works ? during the handshake (after the hello client), the exploit send ahandshake_failure15030000020228then the browser should resend a hello client with SSLv3.0 as default protocol. Tested on chrome version 15 but it's not working on Firefox (I think he doesn't support protocol renegociation), check#4
임베디드 SIM(eSIM 또는 eUICC) 기술을 사용하면 휴대기기 사용자는 실물 SIM 카드 없이 이동통신사 프로필을 다운로드하고 이동통신사의 서비스를 활성화할 수 있습니다. 이 기술은 GSMA에서 지원하는 글로벌 사양으로 모든 휴대기기의 원격 SIM 프로비저닝(RSP)을 사용 설정할 수 있습니다. Android 프레임워크는 Android 9부터 eSIM 액세스 및 eSIM의 구독 프로필 관리를 위한 표준 API를 제공합니다. 이러한eUICC API를 사용하면 서드 파티가 eSIM 지원 Android 기기에서 자체 이동통신사 앱 및 로컬 프로필 도우미(LPA)를 개발할 수 있습니다.
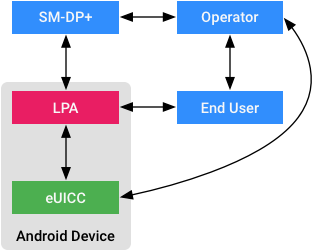
LPA는 Android 빌드 이미지에 포함되어야 하는 독립형 시스템 앱입니다. LPA는 SM-DP+(프로필 패키지를 준비하고 저장하여 기기에 전달하는 원격 서비스)와 eUICC 칩 사이를 연결하는 역할을 하므로 일반적으로 eSIM의 프로필 관리 작업을 담당합니다. LPA APK는 LPA UI 또는 LUI라 불리는 UI 구성요소를 선택적으로 포함할 수 있습니다. 이 구성요소를 통해 최종 사용자는 삽입된 모든 구독 프로필을 한곳에서 관리할 수 있습니다. Android 프레임워크는 사용 가능한 최적의 LPA를 자동으로 탐색하여 연결하고 LPA 인스턴스를 통해 모든 eUICC 작업을 라우팅합니다.
그림 1.단순화된 RSP 아키텍처
이동통신사 앱을 만들려는 모바일 네트워크 운영자는downloadSubscription(),switchToSubscription()및deleteSubscription()과 같은 상위 수준의 프로필 관리 작업을 제공하는EuiccManager의 API를 살펴봐야 합니다.
자체 LPA 시스템 앱을 만들려는 기기 OEM은 Android 프레임워크가 LPA 서비스에 연결되도록EuiccService를 확장해야 합니다. 또한, GSMA RSP v2.0 기반의 ES10x 함수를 제공하는EuiccCardManager의 API를 사용해야 합니다. 이러한 함수는prepareDownload(),loadBoundProfilePackage(),retrieveNotificationList()및resetMemory()와 같은 명령어를 eUICC 칩에 실행하는 데 사용됩니다.
Android 10 이상을 실행하는 기기는 여러 eSIM을 사용하는 기기를 지원할 수 있습니다. 자세한 내용은여러 eSIM 지원을 참고하세요.
이동통신사 앱 만들기
Android 9의 eUICC API를 사용하면 모바일 네트워크 운영자가 이동통신사 브랜드의 앱을 만들어 프로필을 직접 관리할 수 있습니다. 즉, 이동통신사가 소유한 구독 프로필을 다운로드 및 삭제하고 이러한 프로필로 전환하는 등의 관리가 가능합니다.
EuiccManager
EuiccManager는 앱이 LPA와 상호작용하는 기본 진입점입니다. 여기에는 이동통신사가 소유한 구독을 다운로드 및 삭제하고 이러한 구독으로 전환하는 이동통신사 앱이 포함됩니다. 또한, 삽입된모든구독을 한곳의 UI에서 관리할 수 있는 LUI 시스템 앱이 포함됩니다. 이는EuiccService를 제공하는 앱과는 별도의 앱일 수 있습니다.
공개 API를 사용하려면 먼저 이동통신사 앱에서 다음과 같이Context#getSystemService를 통해EuiccManager의 인스턴스를 가져와야 합니다.
eSIM 작업을 실행하기 전에 기기에서 eSIM을 지원하는지 확인해야 합니다.android.hardware.telephony.euicc기능이 정의되어 있고 LPA 패키지가 있다면EuiccManager#isEnabled()는 일반적으로true를 반환합니다.
if (mgr == null || !mgr.isEnabled()) {
    return;
}
다음과 같은 방법으로 eUICC 하드웨어와 eSIM OS 버전에 관한 정보를 얻을 수 있습니다.
EuiccInfo info = mgr.getEuiccInfo();
String osVer = info.getOsVersion();
downloadSubscription()및switchToSubscription()과 같은 많은 API는 완료하는 데 몇 초 또는 몇 분이 걸릴 수 있기 때문에PendingIntent콜백을 사용합니다.PendingIntent는 LPA에서EXTRA_EMBEDDED_SUBSCRIPTION_DETAILED_CODE로 전파되는 임의의 자세한 결과 코드뿐만 아니라 프레임워크에서 정의한 오류 코드를 제공하는EuiccManager#EMBEDDED_SUBSCRIPTION_RESULT_공간의 결과 코드와 함께 전송되므로 이동통신사 앱에서 로깅/디버깅 목적으로 추적할 수 있습니다.PendingIntent콜백은BroadcastReceiver여야 합니다.
다운로드 가능한 특정 구독(활성화 코드또는 QR 코드에서 생성)을 다운로드하려면 다음을 따르세요.
// Register receiver.
static final String ACTION_DOWNLOAD_SUBSCRIPTION = "download_subscription";
static final String LPA_DECLARED_PERMISSION
    = "com.your.company.lpa.permission.BROADCAST";
BroadcastReceiver receiver =
        new BroadcastReceiver() {
            @Override
            public void onReceive(Context context, Intent intent) {
                if (!action.equals(intent.getAction())) {
                    return;
                }
                resultCode = getResultCode();
                detailedCode = intent.getIntExtra(
                    EuiccManager.EXTRA_EMBEDDED_SUBSCRIPTION_DETAILED_CODE,
                    0 /* defaultValue*/);

                // If the result code is a resolvable error, call startResolutionActivity
                if (resultCode == EuiccManager.EMBEDDED_SUBSCRIPTION_RESULT_RESOLVABLE_ERROR) {
                    PendingIntent callbackIntent = PendingIntent.getBroadcast(
                        getContext(), 0 /* requestCode */, intent,
                        PendingIntent.FLAG_UPDATE_CURRENT | PendingIntent.FLAG_MUTABLE);
                    mgr.startResolutionActivity(
                        activity,
                        0 /* requestCode */,
                        intent,
                        callbackIntent);
                }

                resultIntent = intent;
            }
        };
context.registerReceiver(receiver,
        new IntentFilter(ACTION_DOWNLOAD_SUBSCRIPTION),
        LPA_DECLARED_PERMISSION /* broadcastPermission*/,
        null /* handler */);

// Download subscription asynchronously.
DownloadableSubscription sub = DownloadableSubscription
        .forActivationCode(code /* encodedActivationCode*/);
Intent intent = new Intent(action);
PendingIntent callbackIntent = PendingIntent.getBroadcast(
        getContext(), 0 /* requestCode */, intent,
        PendingIntent.FLAG_UPDATE_CURRENT | PendingIntent.FLAG_MUTABLE);
mgr.downloadSubscription(sub, true /* switchAfterDownload */,
        callbackIntent);
구독 ID가 지정된 구독으로 전환하려면 다음을 따르세요.
// Register receiver.
static final String ACTION_SWITCH_TO_SUBSCRIPTION = "switch_to_subscription";
static final String LPA_DECLARED_PERMISSION
    = "com.your.company.lpa.permission.BROADCAST";
BroadcastReceiver receiver =
        new BroadcastReceiver() {
            @Override
            public void onReceive(Context context, Intent intent) {
                if (!action.equals(intent.getAction())) {
                    return;
                }
                resultCode = getResultCode();
                detailedCode = intent.getIntExtra(
                    EuiccManager.EXTRA_EMBEDDED_SUBSCRIPTION_DETAILED_CODE,
                    0 /* defaultValue*/);
                resultIntent = intent;
            }
        };
context.registerReceiver(receiver,
        new IntentFilter(ACTION_SWITCH_TO_SUBSCRIPTION),
        LPA_DECLARED_PERMISSION /* broadcastPermission*/,
        null /* handler */);

// Switch to a subscription asynchronously.
Intent intent = new Intent(action);
PendingIntent callbackIntent = PendingIntent.getBroadcast(
        getContext(), 0 /* requestCode */, intent,
        PendingIntent.FLAG_UPDATE_CURRENT | PendingIntent.FLAG_MUTABLE);
mgr.switchToSubscription(1 /* subscriptionId */, callbackIntent);
EuiccManagerAPI와 코드 예의 전체 목록은eUICC API에서 볼 수 있습니다.
해결 가능한 오류
시스템에서 eSIM 작업을 완료할 수 없지만 오류가 사용자에 의해 해결될 수 있는 몇 가지 경우가 있습니다. 예를 들어, 프로필 메타데이터에이동통신사 확인 코드가 필수라고 표시되어 있으면downloadSubscription은 실패할 수 있습니다. 또는 이동통신사 앱에 대상 프로필(이동통신사가 소유한 프로필)에 관한 이동통신사 권한은 있지만 현재 사용 설정된 프로필에 관한 이동통신사 권한은 없는 경우switchToSubscription이 실패할 수 있으며 이런 이유로 사용자의 동의가 필요합니다.
이러한 상황에서 호출자의 콜백은EuiccManager#EMBEDDED_SUBSCRIPTION_RESULT_RESOLVABLE_ERROR와 함께 호출됩니다. 콜백Intent는 호출자가 인텐트를EuiccManager#startResolutionActivity에 전달할 때 LUI를 통해 확인을 요청할 수 있도록 내부 추가 항목들을 포함합니다. 예를 들어, 확인 코드를 다시 사용하면EuiccManager#startResolutionActivity에서 사용자가 확인 코드를 입력할 수 있는 LUI 화면을 트리거합니다. 코드를 입력하면 다운로드 작업이 계속됩니다. 이 접근 방식은 이동통신사 앱에 UI가 표시되는 시점에 관한 전체 제어권을 부여하지만 LPA/LUI에는 향후 클라이언트 앱을 변경하지 않고 사용자가 복구할 수 있는 문제를 처리하는 새로운 방식을 추가하도록 확장 가능한 방법을 제공합니다.
Android 9는 LUI에서 처리해야 하는 이러한 해결 가능한 오류를 다음과 같이EuiccService에 정의합니다.
/**
 * Alert the user that this action will result in an active SIM being
 * deactivated. To implement the LUI triggered by the system, you need to define
 * this in AndroidManifest.xml.
 */
public static final String ACTION_RESOLVE_DEACTIVATE_SIM =
        "android.service.euicc.action.RESOLVE_DEACTIVATE_SIM";
/**
 * Alert the user about a download/switch being done for an app that doesn't
 * currently have carrier privileges.
 */
public static final String ACTION_RESOLVE_NO_PRIVILEGES =
        "android.service.euicc.action.RESOLVE_NO_PRIVILEGES";

/** Ask the user to resolve all the resolvable errors. */
public static final String ACTION_RESOLVE_RESOLVABLE_ERRORS =
        "android.service.euicc.action.RESOLVE_RESOLVABLE_ERRORS";
이동통신사 권한
EuiccManager를 호출하여 기기에 프로필을 다운로드하는 자체 이동통신사 앱을 개발하는 이동통신사라면 메타데이터의 이동통신사 앱에 상응하는 이동통신사 권한 규칙을 프로필에 포함해야 합니다. 이는 서로 다른 이동통신사에 속한 구독 프로필이 기기의 eUICC에 공존할 수 있고, 각 이동통신사 앱은 이동통신사에서 소유한 프로필에만 액세스할 수 있어야 하기 때문입니다. 예를 들어, 이동통신사 A에서 이동통신사 B가 소유한 프로필을 다운로드하거나 사용 또는 사용 중지할 수 있어서는 안 됩니다.
소유자만 프로필에 액세스할 수 있도록 하기 위해 Android는 프로필 소유자 앱(즉, 이동통신사 앱)에 특별한 권한을 부여하는 메커니즘을 사용합니다. Android 플랫폼은 프로필의 액세스 규칙 파일(ARF)에 저장된 인증서를 로드하고 이 인증서에서 서명한 앱에 권한을 부여하여EuiccManagerAPI를 호출합니다. 상위 수준의 프로세스는 다음과 같습니다.
Android 플랫폼은 호출자 앱 인증서의 SHA-1 또는 SHA-256 해시가 대상 프로필의 ARF에서 가져온 인증서 서명과 일치하는지 확인합니다. 이동통신사 앱의 패키지 이름이 ARF에 포함되어 있다면 이 이름은 호출자 앱의 패키지 이름과도 일치해야 합니다.
서명 및 패키지 이름(포함된 경우)이 확인된 후에는 대상 프로필에 대한 이동통신사 권한이 호출자 앱에 부여됩니다.
프로필 메타데이터는 LPA가 프로필 메타데이터를 프로필이 다운로드되기 전에 SM-DP+에서 가져오거나 프로필이 사용 중지된 경우 ISD-R에서 가져올 수 있도록 프로필 외부에서도 사용할 수 있기 때문에, 프로필과 동일한 이동통신사 권한 규칙을 포함해야 합니다.
eUICC OS 및 SM-DP+는 프로필 메타데이터에서 독점 태그BF76을 지원해야 합니다. 태그 콘텐츠는 다음과 같이UICC 이동통신사 권한에 정의된 액세스 규칙 애플릿(ARA)에서 반환한 것과 동일한 이동통신사 권한 규칙이어야 합니다.
RefArDo ::= [PRIVATE 2] SEQUENCE {  -- Tag E2
    refDo [PRIVATE 1] SEQUENCE {  -- Tag E1
        deviceAppIdRefDo [PRIVATE 1] OCTET STRING (SIZE(20|32)),  -- Tag C1
        pkgRefDo [PRIVATE 10] OCTET STRING (SIZE(0..127)) OPTIONAL  -- Tag CA
    },
    arDo [PRIVATE 3] SEQUENCE {  -- Tag E3
        permArDo [PRIVATE 27] OCTET STRING (SIZE(8))  -- Tag DB
    }
}
앱 서명에 관한 자세한 내용은앱 서명을 참고하세요. 이동통신사 권한에 관한 자세한 내용은UICC 이동통신사 권한을 참고하세요.
로컬 프로필 어시스턴트 앱 만들기
Android Euicc API를 사용하여 연결해야 하는 자체 로컬 프로필 어시스턴트(LPA)를 구현할 수 있습니다. 다음 섹션에서는 LPA 앱을 만들고 Android 시스템과 통합하는 방법에 관한 간단한 개요를 설명합니다.
하드웨어/모뎀 요구사항
eUICC 칩의 LPA 및 eSIM OS는 최소 GSMA RSP(원격 SIM 프로비저닝) v2.0 또는 v2.2를 지원해야 합니다. 또한, RSP 버전이 일치하는 SM-DP+ 및 SM-DS 서버 사용을 계획해야 합니다. 자세한 RSP 아키텍처는GSMA SGP.21 RSP 아키텍처 사양을 참고하세요.
또한, Android 9의 eUICC API와 통합하려면 기기 모뎀이 인코딩된 eUICC 기능(로컬 프로필 관리 및 프로필 다운로드)을 지원하는 터미널 기능을 전송해야 합니다. 또한, 다음 메서드를 구현해야 합니다.
IRadio HAL v1.1:setSimPower
IRadio HAL v1.2:getIccCardStatus참고:IRadio HAL v1.4 지원 기능은 Android 10을 실행하는 기기에 필요하며 다른 모든 버전의 Android에서도 사용하는 것이 좋습니다.
IRadioConfig HAL v1.0:getSimSlotsStatus참고:IRadioConfig HAL v1.2 지원 기능은 Android 10을 실행하는 기기에 필요하며 다른 모든 버전의 Android에서도 사용하는 것이 좋습니다.
모뎀은 유효한 SIM으로 사용 설정된 기본 부팅 프로필로 eSIM을 인식하고 SIM 전원이 켜진 상태를 유지해야 합니다.
Android 10을 실행하는 기기에서는 비탈착식 eUICC 슬롯 ID 배열을 정의해야 합니다. 아래arrays.xml예를 참고하세요.
<resources>
   <!-- Device-specific array of SIM slot indexes which are are embedded eUICCs.
        e.g. If a device has two physical slots with indexes 0, 1, and slot 1 is an
        eUICC, then the value of this array should be:
            <integer-array name="non_removable_euicc_slots">
                <item>1</item>
            </integer-array>
        If a device has three physical slots and slot 1 and 2 are eUICCs, then the value of
        this array should be:
            <integer-array name="non_removable_euicc_slots">
               <item>1</item>
               <item>2</item>
            </integer-array>
        This is used to differentiate between removable eUICCs and built in eUICCs, and should
        be set by OEMs for devices which use eUICCs. -->

   <integer-array name="non_removable_euicc_slots">
       <item>1</item>
   </integer-array>
</resources>
LPA는 LPA 백엔드 및 LPA UI(LUI), 이렇게 두 개의 개별 구성요소로 구성되어 있습니다(동일한 APK에 모두 구현될 수 있음).
LPA 백엔드를 구현하려면EuiccService를 확장하고 매니페스트 파일에 이 서비스를 선언해야 합니다. 서비스는 시스템만 서비스에 결합할 수 있도록 하기 위해android.permission.BIND_EUICC_SERVICE시스템 권한을 요구해야 합니다. 또한 서비스에는android.service.euicc.EuiccService작업이 있는 인텐트 필터가 포함되어야 있어야 합니다. 기기에 여러 구현이 있다면 인텐트 필터의 우선순위를 0이 아닌 값으로 설정해야 합니다. 예:
내부적으로 Android 프레임워크는 활성 LPA를 결정하고 필요한 경우 Android eUICC API를 지원하기 위해 해당 LPA와 상호작용합니다.PackageManager는android.service.euicc.EuiccService작업의 서비스를 지정하는android.permission.WRITE_EMBEDDED_SUBSCRIPTIONS권한을 가진 모든 앱에 쿼리됩니다. 우선순위가 가장 높은 서비스가 선택됩니다. 서비스가 없으면 LPA 지원이 중지됩니다.
서비스와 마찬가지로 각 활동은android.permission.BIND_EUICC_SERVICE시스템 권한을 요구해야 합니다. 각 활동에는 적절한 작업,android.service.euicc.category.EUICC_UI카테고리 및 0이 아닌 우선순위가 지정된 인텐트 필터가 있어야 합니다.EuiccService의 구현을 선택하는 것과 마찬가지로 유사한 로직을 사용하여 이러한 활동의 구현을 선택합니다. 예:
이는 이러한 화면을 구현하는 UI가EuiccService를 구현하는 APK가 아닌 다른 APK에서 제공될 수 있음을 의미합니다. 단일 APK를 사용할지 또는 여러 APK(예:EuiccService를 구현하는 APK와 LUI 활동을 제공하는 APK)를 사용할지 여부는 디자인 선택입니다.
EuiccCardManager
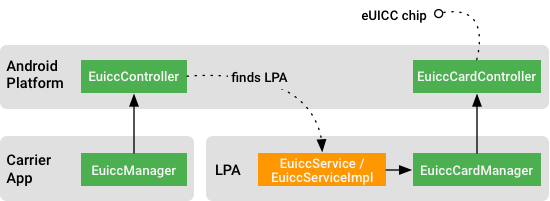
EuiccCardManager는 eSIM 칩과 통신하기 위한 인터페이스입니다. GSMA RSP 사양에 설명된 대로 ES10 함수를 제공하고 ASN.1 파싱과 함께 하위 수준의 APDU 요청/응답 명령어를 처리합니다.EuiccCardManager는 시스템 API이며 시스템 권한을 가진 앱에서만 호출할 수 있습니다.
그림 2.이동통신사 앱과 LPA 모두 Euicc API 사용
EuiccCardManager를 통한 프로필 작업 API는 호출자가 LPA여야 합니다. 이는 Android 프레임워크에서 시행합니다. 즉, 호출자는 이전 섹션에서 설명한 것처럼EuiccService를 확장하고 매니페스트 파일에 선언되어야 합니다.
EuiccManager와 마찬가지로EuiccCardManagerAPI를 사용하려면 먼저 다음과 같이 LPA에서Context#getSystemService를 통해EuiccCardManager의 인스턴스를 가져와야 합니다.
ResultCallback<EuiccProfileInfo[]> callback =
       new ResultCallback<EuiccProfileInfo[]>() {
           @Override
           public void onComplete(int resultCode,
                   EuiccProfileInfo[] result) {
               if (resultCode == EuiccCardManagerReflector.RESULT_OK) {
                   // handle result
               } else {
                   // handle error
               }
           }
       };

cardMgr.requestAllProfiles(eid, AsyncTask.THREAD_POOL_EXECUTOR, callback);
내부적으로EuiccCardManager는 AIDL 인터페이스를 통해EuiccCardController(전화 프로세스에서 실행됨)에 결합하고 각EuiccCardManager메서드는 다른 전용 AIDL 인터페이스를 통해 전화 프로세스에서 콜백을 수신합니다.EuiccCardManagerAPI를 사용할 때 호출자(LPA)는Executor객체를 제공해야 하며 이 객체를 통해 콜백이 호출됩니다. 이Executor객체는 단일 스레드 또는 선택한 스레드 풀에서 실행할 수 있습니다.
대부분의EuiccCardManagerAPI는 동일한 사용 패턴을 보입니다. 예를 들어, 결합한 프로필 패키지를 eUICC로 로드하는 방법은 다음과 같습니다.
Android 9 이상을 실행하는 기기에서는 이동통신사 앱을 사용하여 eSIM을 활성화하고 프로필을 다운로드할 수 있습니다. 이동통신사 앱은downloadSubscription을 직접 호출하거나 LPA에 활성화 코드를 제공하여 프로필을 다운로드할 수 있습니다.
이동통신사 앱이downloadSubscription을 호출하여 프로필을 다운로드할 때 호출은 앱이 프로필의이동통신사 권한 규칙을 인코딩하는BF76메타데이터 태그를 통해 프로필을 관리할 수 있도록 합니다. 프로필에BF76태그가 없거나BF76태그가 호출하는 이동통신사 앱의 서명과 일치하지 않으면 다운로드가 거부됩니다.
아래 섹션에서는 활성화 코드를 사용하여 이동통신사 앱을 통해 eSIM을 활성화하는 방법을 설명합니다.
활성화 코드를 사용하여 eSIM 활성화
활성화 코드를 사용하여 eSIM 프로필을 활성화할 때 LPA는 이동통신사 앱에서 활성화 코드를 가져오고 프로필을 다운로드합니다. 이 흐름은 LPA에 의해 시작될 수 있으며 LPA는 UI 흐름 전체를 제어할 수 있습니다. 즉, 이동통신사 앱 UI가 표시되지 않습니다. 이 접근법은BF76태그 확인을 우회하므로 네트워크 운영자는 eSIM 프로필 다운로드 및 오류 처리를 포함하여 eSIM 활성화 UI 흐름 전체를 구현할 필요가 없습니다.
이동통신사 eUICC 프로비저닝 서비스 정의
LPA 및 이동통신사 앱은 두 가지AIDL인터페이스, 즉ICarrierEuiccProvisioningService및IGetActivationCodeCallback을 통해 통신합니다. 이동통신사 앱은ICarrierEuiccProvisioningService인터페이스를 구현하여매니페스트 선언에 노출해야 합니다. LPA는ICarrierEuiccProvisioningService에 결합하고IGetActivationCodeCallback을 구현해야 합니다. AIDL 인터페이스를 구현하고 노출하는 방법에 관한 자세한 내용은정의 및 AIDL 인터페이스를 참고하세요.
AIDL 인터페이스를 정의하려면 LPA와 이동통신사 앱 모두를 대상으로 다음 AIDL 파일을 만드세요.
ICarrierEuiccProvisioningService.aidl
package android.service.euicc;

import android.service.euicc.IGetActivationCodeCallback;

oneway interface ICarrierEuiccProvisioningService {
    // The method to get the activation code from the carrier app. The caller needs to pass in
    // the implementation of IGetActivationCodeCallback as the parameter.
    void getActivationCode(in IGetActivationCodeCallback callback);

    // The method to get the activation code from the carrier app. The caller needs to pass in
    // the activation code string as the first parameter and the implementation of
    // IGetActivationCodeCallback as the second parameter. This method provides the carrier
    // app the device EID which allows a carrier to pre-bind a profile to the device's EID before
    // the download process begins.
    void getActivationCodeForEid(in String eid, in IGetActivationCodeCallback callback);
}
IGetActivationCodeCallback.aidl
package android.service.euicc;

oneway interface IGetActivationCodeCallback {
    // The call back method needs to be called when the carrier app gets the activation
    // code successfully. The caller needs to pass in the activation code string as the
    // parameter.
    void onSuccess(String activationCode);

    // The call back method needs to be called when the carrier app failed to get the
    // activation code.
    void onFailure();
}
LPA 구현 예
이동통신사 앱의ICarrierEuiccProvisioningService구현에 결합하려면 LPA가ICarrierEuiccProvisioningService.aidl과IGetActivationCodeCallback.aidl을 모두 프로젝트에 복사하고ServiceConnection을 구현해야 합니다.
이동통신사 앱의ICarrierEuiccProvisioningService구현에 결합한 후 LPA는getActivationCode또는getActivationCodeForEid를 호출하여IGetActivationCodeCallback스터브 클래스의 구현을 전달함으로써 이동통신사 앱에서 활성화 코드를 가져옵니다.
getActivationCode와getActivationCodeForEid의 차이점은 바로getActivationCodeForEid는 다운로드 프로세스가 시작되기 전에 이동통신사가 프로필을 기기의 EID에 미리 결합할 수 있도록 한다는 것입니다.
void getActivationCodeFromCarrierApp() {
    IGetActivationCodeCallback.Stub callback =
            new IGetActivationCodeCallback.Stub() {
                @Override
                public void onSuccess(String activationCode) throws RemoteException {
                    // Handle the case LPA success to get activation code from a carrier app.
                }

                @Override
                public void onFailure() throws RemoteException {
                    // Handle the case LPA failed to get activation code from a carrier app.
                }
            };

    try {
        mCarrierProvisioningService.getActivationCode(callback);
    } catch (RemoteException e) {
        // Handle Remote Exception
    }
}
이동통신사 앱 구현 예
LPA가 이동통신사 앱에 결합하려면 이동통신사 앱이ICarrierEuiccProvisioningService.aidl과IGetActivationCodeCallback.aidl을 모두 프로젝트에 복사하고AndroidManifest.xml파일에서ICarrierEuiccProvisioningService서비스를 선언해야 합니다. 시스템 권한이 있는 앱인 LPA만 서비스에 결합할 수 있도록 하려면 서비스에android.permission.WRITE_EMBEDDED_SUBSCRIPTIONS시스템 권한이 있어야 합니다. 또한 서비스에는android.service.euicc.action.BIND_CARRIER_PROVISIONING_SERVICE작업이 있는 인텐트 필터가 포함되어 있어야 합니다.
AIDL 이동통신사 앱 서비스를 구현하려면 서비스를 생성하고Stub클래스를 확장한 후getActivationCode및getActivationCodeForEid메서드를 구현합니다. 그러면 LPA는 두 메서드 중 하나를 호출하여 프로필 활성화 코드를 가져올 수 있습니다. 이동통신사의 서버에서 코드를 성공적으로 가져왔다면 이동통신사 앱은 활성화 코드와 함께IGetActivationCodeCallback#onSuccess를 호출하여 응답해야 합니다. 코드를 가져오지 못했다면 이동통신사 앱은IGetActivationCodeCallback#onFailure로 응답해야 합니다.
CarrierEuiccProvisioningService.java
import android.service.euicc.ICarrierEuiccProvisioningService;
import android.service.euicc.ICarrierEuiccProvisioningService.Stub;
import android.service.euicc.IGetActivationCodeCallback;

public class CarrierEuiccProvisioningService extends Service {
    private final ICarrierEuiccProvisioningService.Stub binder =
        new Stub() {
          @Override
          public void getActivationCode(IGetActivationCodeCallback callback) throws RemoteException {
            String activationCode = // do whatever work necessary to get an activation code (HTTP requests to carrier server, fetch from storage, etc.)
            callback.onSuccess(activationCode);
          }

          @Override
          public void getActivationCodeForEid(String eid, IGetActivationCodeCallback callback) throws RemoteException {
            String activationCode = // do whatever work necessary (HTTP requests, fetch from storage, etc.)
            callback.onSuccess(activationCode);
          }
      }
}
LPA 활성화 흐름에서 이동통신사 앱 UI 시작
Android 11 이상을 실행하는 기기에서는 LPA가 이동통신사 앱의 UI를 시작할 수 있습니다. 이 기능은 이동통신사 앱이 LPA에 활성화 코드를 제공하기 전에 사용자의 추가 정보가 필요할 때 유용합니다. 예를 들어 이동통신사는 사용자가 로그인하여 전화번호를 활성화하거나 다른 포팅 서비스를 실행하도록 해야 할 수 있습니다.
다음은 LPA에서 이동통신사 앱 UI를 시작하는 프로세스입니다.
LPA는android.service.euicc.action.START_CARRIER_ACTIVATION인텐트를 작업이 포함된 이동통신사 앱 패키지로 전송하여 이동통신사 앱의 활성화 흐름을 시작합니다. (LPA 이외의 앱에서 인텐트를 수신하지 않도록 하려면 이동통신사 앱 수신기가android:permission="android.permission.WRITE_EMBEDDED_SUBSCRIPTIONS"로 매니페스트 선언에서 보호되어야 합니다.)
String packageName = // The carrier app's package name

Intent carrierAppIntent =
    new Intent(“android.service.euicc.action.START_CARRIER_ACTIVATION”)
        .setPackage(packageName);

ResolveInfo activity =
    context.getPackageManager().resolveActivity(carrierAppIntent, 0);

carrierAppIntent
    .setClassName(activity.activityInfo.packageName, activity.activityInfo.name);

startActivityForResult(carrierAppIntent, requestCode);
이동통신사 앱은 자체 UI를 사용하여 작업을 실행합니다. 예를 들어 사용자 로그인 또는 이동통신사의 백엔드로 HTTP 요청 전송을 실행합니다.
이동통신사 앱이RESULT_OK로 응답하면 LPA는 활성화 흐름을 계속합니다. 이동통신사 앱은 LPA를 통해 이동통신사 앱의 서비스를 결합하는 대신 사용자가 QR 코드를 스캔해야 한다고 판단하면RESULT_OK와 함께setResult(int, Intent)를 사용하고true로 설정된 부울 추가 항목android.telephony.euicc.extra.USE_QR_SCANNER가 포함된Intent인스턴스를 사용하여 LPA에 응답합니다. 그러면 LPA는 추가 항목을 확인하며 이동통신사 앱의ICarrierEuiccProvisioningService구현을 결합하는 대신 QR 스캐너를 시작합니다.
이동통신사 앱이 비정상 종료되거나RESULT_CANCELED(기본 응답 코드)로 응답하면 LPA가 eSIM 활성화 흐름을 취소합니다.
이동통신사 앱이RESULT_OK또는RESULT_CANCELED이외의 다른 코드로 응답하면 LPA는 이를 오류로 처리합니다.
보안상의 이유로 LPA는 비 LPA 호출자가 이동통신사 앱에서 활성화 코드를 가져올 수 없도록 결과 인텐트에 제공된 활성화 코드를 직접 받아서는안 됩니다.
이동통신사 앱에서 LPA 활성화 흐름 시작
Android 11부터는 이동통신사 앱이 eUICC API를 사용하여 eSIM 활성화를 위한 LUI를 시작할 수 있습니다. 이 메서드는 LPA의 eSIM 활성화 흐름 UI를 표시하여 eSIM 프로필을 활성화합니다. 그러면 LPA는 eSIM 프로필 활성화가 완료될 때 브로드캐스트를 전송합니다.
LPA는android.service.euicc.action.START_EUICC_ACTIVATION작업과 함께 인텐트 필터가 포함된 활동을 선언해야 합니다. 기기에 여러 구현이 있다면 인텐트 필터의 우선순위를 0이 아닌 값으로 설정해야 합니다. 예:
이동통신사 앱은 자체 UI를 사용하여 작업을 실행합니다. 예를 들어 사용자 로그인 또는 이동통신사의 백엔드로 HTTP 요청 전송을 실행합니다.
이 시점에서 이동통신사 앱은ICarrierEuiccProvisioningService구현을 통해 활성화 코드를 제공할 준비가 되어 있어야 합니다. 이동통신사 앱은android.telephony.euicc.action.START_EUICC_ACTIVATION작업과 함께startActivityForResult(Intent, int)를 호출하여 LPA를 시작합니다. 또한 LPA는 부울 추가 항목android.telephony.euicc.extra.USE_QR_SCANNER를 확인합니다. 값이true이면 LPA가 QR 스캐너를 시작하여 사용자가 프로필 QR 코드를 스캔할 수 있도록 합니다.
LPA 측에서 LPA는 이동통신사 앱의ICarrierEuiccProvisioningService구현에 결합하여 활성화 코드를 가져오고 해당 프로필을 다운로드합니다. LPA는 로드 화면과 같이 다운로드 과정에서 필요한 모든 UI 요소를 표시합니다.
LPA 활성화 흐름이 완료되면 LPA는 이동통신사 앱이onActivityResult(int, int, Intent)에서 처리하는 결과 코드로 이동통신사 앱에 응답합니다.
LPA는 새 eSIM 프로필을 성공적으로 다운로드하면RESULT_OK로 응답합니다.
사용자가 LPA에서 eSIM 프로필 활성화를 취소하면 LPA는RESULT_CANCELED로 응답합니다.
LPA가RESULT_OK또는RESULT_CANCELED이외의 다른 코드로 응답하면 이동통신사 앱은 이를 오류로 처리합니다.
보안상의 이유로 LPA는 비 LPA 호출자가 이동통신사 앱에서 활성화 코드를 가져올 수 없도록 제공된 인텐트에서 활성화 코드를 직접 받지않습니다.
여러 eSIM 지원
참고:Android 13 이상을 실행하는 기기에서는 사용 설정된 프로필을 여러 개 지원할 수 있으므로 단일 eSIM을 사용하면 여러 프로필을 동시에 지원할 수 있습니다. 자세한 내용은다중 지원 프로필을 참고하세요.
Android 10 이상을 실행하는 기기의 경우EuiccManager클래스는 여러 eSIM이 있는 기기를 지원합니다. 플랫폼이 자동으로EuiccManager인스턴스를 기본 eUICC와 연결하므로 Android 10으로 업그레이드하는 단일 eSIM을 사용하는 기기는 LPA 구현을 수정할 필요가 없습니다. 기본 eUICC는 Radio HAL 버전이 1.2 이상인 기기의 플랫폼 및 Radio HAL 버전이 1.2 미만인 기기의 LPA에 의해 결정됩니다.
요구사항
여러 eSIM을 지원하려면 기기에 2개 이상의 eUICC가 있어야 합니다. 이 eUICC는 내장 eUICC이거나 탈착식 eUICC를 삽입할 수 있는 물리적 SIM 슬롯일 수 있습니다.
여러 개의 eSIM을 지원하려면 Radio HAL 버전이 1.2 이상이어야 합니다. Radio HAL 버전 1.4 및 RadioConfig HAL 버전 1.2를 사용하는 것이 좋습니다.
구현
여러 eSIM(탈착식 eUICC 또는 프로그래밍 가능한 SIM 포함)을 지원하려면 LPA는 호출자가 제공한 카드 ID에 대응하는 슬롯 ID를 수신하는EuiccService를 구현해야 합니다.
또한 카드 ID는TelephonyManager의getUiccCardsInfo와getUiccSlotsInfo(시스템 API) 및SubscriptionInfo의getCardId를 통해 얻을 수 있습니다.
EuiccManager객체가 특정 카드 ID로 인스턴스화됐다면 모든 작업이 해당 카드 ID를 사용하는 eUICC로 전달됩니다. eUICC에 연결할 수 없다면(예: eUICC가 사용 중지되거나 삭제된 경우)EuiccManager는 더 이상 작동하지 않습니다.
다음 코드 샘플을 사용하여 이동통신사 앱을 만들 수 있습니다.
예 1: 활성 구독 가져오기 및EuiccManager인스턴스화하기
// Get the active subscription and instantiate an EuiccManager for the eUICC which holds
// that subscription
SubscriptionManager subMan = (SubscriptionManager)
        mContext.getSystemService(Context.TELEPHONY_SUBSCRIPTION_SERVICE);
int cardId = subMan.getActiveSubscriptionInfo().getCardId();
EuiccManager euiccMan = (EuiccManager) mContext.getSystemService(Context.EUICC_SERVICE)
            .createForCardId(cardId);
예 2: UICC를 반복하고 탈착식 eUICC용EuiccManager인스턴스화하기
// On a device with a built-in eUICC and a removable eUICC, iterate through the UICC cards
// to instantiate an EuiccManager associated with a removable eUICC
TelephonyManager telMan = (TelephonyManager)
        mContext.getSystemService(Context.TELEPHONY_SERVICE);
List<UiccCardInfo> infos = telMan.getUiccCardsInfo();
int removableCardId = -1; // valid cardIds are 0 or greater
for (UiccCardInfo info : infos) {
    if (info.isRemovable()) {
        removableCardId = info.getCardId();
        break;
    }
}
if (removableCardId != -1) {
    EuiccManager euiccMan = (EuiccManager) mContext.getSystemService(Context.EUICC_SERVICE)
            .createForCardId(removableCardId);
}
유효성 검사
AOSP는 LPA 구현과 함께 제공되지 않으며 모든 Android 빌드에서 LPA를 사용할 수 있는 것은 아닙니다(일부 스마트폰은 eSIM을 지원하지 않음). 따라서 엔드 투 엔드 CTS 테스트 사례는 없습니다. 하지만, 노출된 eUICC API가 Android 빌드에서 유효한지 확인하기 위해 AOSP에서 기본 테스트 사례를 사용할 수 있습니다.
이동통신사 앱을 구현하는 이동통신사는 기본적인 사내 품질보증 주기를 거쳐 구현된 모든 기능이 예상대로 작동하고 있는지 확인해야 합니다. 최소한 이동통신사 앱은 동일한 운영자가 소유한 모든 구독 프로필을 나열하고 프로필을 다운로드 및 설치할 수 있어야 하며 프로필에서 서비스를 활성화하고 프로필을 전환 및 삭제할 수 있어야 합니다.
자체 LPA를 만들고 있다면 더욱 엄격한 테스트를 거쳐야 합니다. 모뎀 공급업체, eUICC 칩 또는 eSIM OS 공급업체, SM-DP+ 공급업체 및 이동통신사와 협업하여 문제를 해결하고 RSP 아키텍처 내에서 LPA의 상호 운용성을 보장해야 합니다. 충분한 양의 수동 테스트는 필수입니다. 최상의 테스트 범위를 얻으려면GSMA SGP.23 RSP 테스트 계획을 따라야 합니다.
이 페이지에 나와 있는 콘텐츠와 코드 샘플에는콘텐츠 라이선스에서 설명하는 라이선스가 적용됩니다. 자바 및 OpenJDK는 Oracle 및 Oracle 계열사의 상표 또는 등록 상표입니다.


