https://github.com/MicrosoftDocs/azure-docs/blob/main/articles/application-gateway/overview-v2.md
azure-docs/articles/application-gateway/overview-v2.md at main · MicrosoftDocs/azure-docs
Open source documentation of Microsoft Azure. Contribute to MicrosoftDocs/azure-docs development by creating an account on GitHub.
github.com
titledescriptionservicesauthorms.servicems.topicms.datems.authorms.custom
|
What is Azure Application Gateway v2?
|
Learn about Azure application Gateway v2 features.
|
application-gateway
|
mbender-ms
|
azure-application-gateway
|
overview
|
10/02/2024
|
mbender
|
references_regions, devx-track-azurepowershell
|
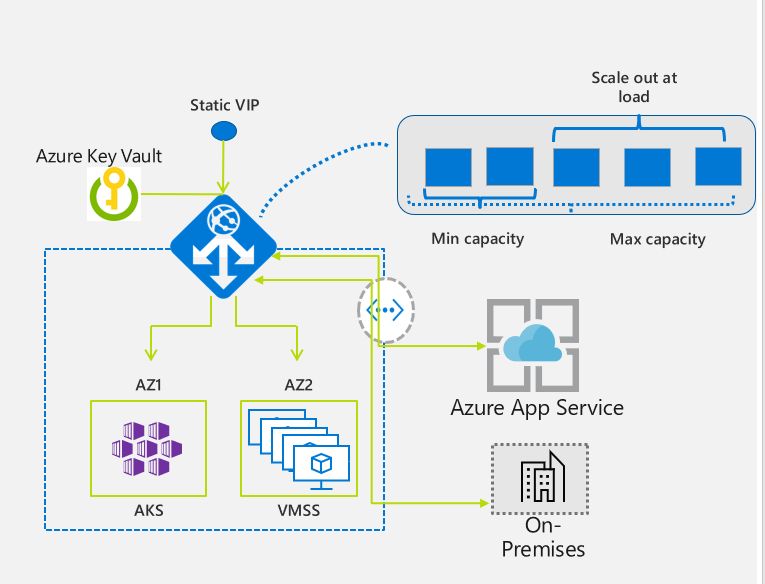
Application Gateway v2 is the latest version of Application Gateway. It provides advantages over Application Gateway v1 such as performance enhancements, autoscaling, zone redundancy, and static VIPs.
Important
Deprecation of Application Gateway V1 was announced on April 28, 2023. If you use Application Gateway V1 SKU, start planning your migration to V2 now and complete your migration to Application Gateway v2 by April 28, 2026. The v1 service isn't supported after this date.
The v2 SKU includes the following enhancements:
- TCP/TLS proxy (Preview): Azure Application Gateway now also supports Layer 4 (TCP protocol) and TLS (Transport Layer Security) proxying. This feature is currently in public preview. For more information, see Application Gateway TCP/TLS proxy overview.
- Autoscaling: Application Gateway or WAF deployments under the autoscaling SKU can scale out or in based on changing traffic load patterns. Autoscaling also removes the requirement to choose a deployment size or instance count during provisioning. This SKU offers true elasticity. In the Standard_v2 and WAF_v2 SKU, Application Gateway can operate both in fixed capacity (autoscaling disabled) and in autoscaling enabled mode. Fixed capacity mode is useful for scenarios with consistent and predictable workloads. Autoscaling mode is beneficial in applications that see variance in application traffic.
- Zone redundancy: An Application Gateway or WAF deployment can span multiple Availability Zones, removing the need to provision separate Application Gateway instances in each zone with a Traffic Manager. You can choose a single zone or multiple zones where Application Gateway instances are deployed, which makes it more resilient to zone failure. The backend pool for applications can be similarly distributed across availability zones.
- Zone redundancy is available only where Azure availability zones are available. In other regions, all other features are supported. For more information, see Azure regions with availability zone support.
- Static VIP: Application Gateway v2 SKU supports the static VIP type exclusively. Static VIP ensures that the VIP associated with the application gateway doesn't change for the lifecycle of the deployment, even after a restart. You must use the application gateway URL for domain name routing to App Services via the application gateway, as v1 doesn't have a static VIP.
- Header Rewrite: Application Gateway allows you to add, remove, or update HTTP request and response headers with v2 SKU. For more information, see Rewrite HTTP headers with Application Gateway
- Key Vault Integration: Application Gateway v2 supports integration with Key Vault for server certificates that are attached to HTTPS enabled listeners. For more information, see TLS termination with Key Vault certificates.
- Mutual Authentication (mTLS): Application Gateway v2 supports authentication of client requests. For more information, see Overview of mutual authentication with Application Gateway.
- Azure Kubernetes Service Ingress Controller: The Application Gateway v2 Ingress Controller allows the Azure Application Gateway to be used as the ingress for an Azure Kubernetes Service (AKS) known as AKS Cluster. For more information, see What is Application Gateway Ingress Controller.
- Private link: The v2 SKU offers private connectivity from other virtual networks in other regions and subscriptions by using private endpoints.
- Performance enhancements: The v2 SKU offers up to 5X better TLS offload performance as compared to the Standard/WAF SKU.
- Faster deployment and update time: The v2 SKU provides faster deployment and update time as compared to Standard/WAF SKU. The faster time also includes WAF configuration changes.
Note
Some of the capabilities listed here are dependent on the SKU type.
Application Gateway v2 is available under two SKUs:
- Basic (preview): The Basic SKU is designed for applications that have lower traffic and SLA requirements, and don't need advanced traffic management features. For information on how to register for the public preview of Application Gateway Basic SKU, see Register for the preview.
- Standard_v2 SKU: The Standard_v2 SKU is designed for running production workloads and high traffic. It also includes autoscaling, which can automatically adjust the number of instances to match your traffic needs.
The following table displays a comparison between Basic and Standard_v2.
FeatureCapabilitiesBasic SKU (preview)Standard SKU
| Reliability | SLA | 99.9 | 99.95 |
| Functionality - basic | HTTP/HTTP2/HTTPS WebSocket Public/Private IP Cookie Affinity Path-based affinity Wildcard Multisite KeyVault Zone Header rewrite |
✓ ✓ ✓ ✓ ✓ ✓ ✓ ✓ ✓ ✓ |
✓ ✓ ✓ ✓ ✓ ✓ ✓ ✓ ✓ ✓ |
| Functionality - advanced | AKS (via AGIC) URL rewrite mTLS Private Link Private-only (preview) TCP/TLS Proxy (preview) |
✓ ✓ ✓ ✓ ✓ ✓ |
|
| Scale | Max. connections per second Number of listeners Number of backend pools Number of backend servers per pool Number of rules |
2001 5 5 5 5 |
625001 100 100 1200 400 |
| Capacity Unit | Connections per second per compute unit Throughput Persistent new connections |
10 2.22 Mbps 2500 |
50 2.22 Mbps 2500 |
1Estimated based on using an RSA 2048-bit key TLS certificate.
With the v2 SKU, consumption drives the pricing model and is no longer attached to instance counts or sizes. To learn more, see Understanding pricing.
Currently, the Standard_v2 and WAF_v2 SKUs aren't available in the following regions:
- China East
- China North
- US DOD East
- US DOD Central
An Azure PowerShell script is available in the PowerShell gallery to help you migrate from your v1 Application Gateway/WAF to the v2 Autoscaling SKU. This script helps you copy the configuration from your v1 gateway. Traffic migration is still your responsibility. For more information, see Migrate Azure Application Gateway from v1 to v2.
The following table compares the features available with each SKU.
Featurev1 SKUv2 SKU
| Autoscaling | ✓ | |
| Zone redundancy | ✓ | |
| Static VIP | ✓ | |
| Azure Kubernetes Service (AKS) Ingress controller | ✓ | |
| Azure Key Vault integration | ✓ | |
| Rewrite HTTP(S) headers | ✓ | |
| Enhanced Network Control (NSG, Route Table, Private IP Frontend only) | ✓ | |
| URL-based routing | ✓ | ✓ |
| Multiple-site hosting | ✓ | ✓ |
| Mutual Authentication (mTLS) | ✓ | |
| Private Link support | ✓ | |
| Traffic redirection | ✓ | ✓ |
| Web Application Firewall (WAF) | ✓ | ✓ |
| WAF custom rules | ✓ | |
| WAF policy associations | ✓ | |
| Transport Layer Security (TLS)/Secure Sockets Layer (SSL) termination | ✓ | ✓ |
| End-to-end TLS encryption | ✓ | ✓ |
| Session affinity | ✓ | ✓ |
| Custom error pages | ✓ | ✓ |
| WebSocket support | ✓ | ✓ |
| HTTP/2 support | ✓ | ✓ |
| Connection draining | ✓ | ✓ |
| Proxy NTLM authentication | ✓ | |
| Path based rule encoding | ✓ | |
| DHE Ciphers | ✓ |
Note
The autoscaling v2 SKU now supports default health probes to automatically monitor the health of all resources in its backend pool and highlight those backend members that are considered unhealthy. The default health probe is automatically configured for backends that don't have any custom probe configuration. To learn more, see health probes in application gateway.
This section describes features and limitations of the v2 SKU that differ from the v1 SKU.
DifferenceDetails
| Mixing Standard_v2 and Standard Application Gateway on the same subnet | Not supported |
| User-Defined Route (UDR) on Application Gateway subnet | For information about supported scenarios, see Application Gateway configuration overview. |
| NSG for Inbound port range | - 65200 to 65535 for Standard_v2 SKU - 65503 to 65534 for Standard SKU. Not required for v2 SKUs in public preview Learn more. For more information, see the FAQ. |
| Performance logs in Azure diagnostics | Not supported. Azure metrics should be used. |
| FIPS mode | Currently not supported. |
| Private frontend configuration only mode | Currently in public preview Learn more. |
| Path based rule encoding | Not supported. V2 decodes paths before routing. For example, V2 treats /abc%2Fdef the same as /abc/def. |
| Chunked file transfer | In the Standard_V2 configuration, turn off request buffering to support chunked file transfer. In WAF_V2, turning off request buffering isn't possible because it has to look at the entire request to detect and block any threats. Therefore, the suggested alternative is to create a path rule for the affected URL and attach a disabled WAF policy to that path rule. |
| Cookie Affinity | Current V2 doesn't support appending the domain in session affinity Set-Cookie, which means that the cookie can't be used by client for the subdomains. |
| Microsoft Defender for Cloud integration | Not yet available. |
Run the following Azure CLI commands to register for the preview of Application Gateway Basic SKU.
Set-AzContext -Subscription "<your subscription ID>"
Get-AzProviderFeature -FeatureName AllowApplicationGatewayBasicSku -ProviderNamespace "Microsoft.Network"
Register-AzProviderFeature -FeatureName AllowApplicationGatewayBasicSku -ProviderNamespace Microsoft.Network
To unregister from the public preview of Basic SKU:
- Delete all instances of Application Gateway Basic SKU from your subscription.
- Run the following Azure CLI commands:
Set-AzContext -Subscription "<your subscription ID>"
Get-AzProviderFeature -FeatureName AllowApplicationGatewayBasicSku -ProviderNamespace "Microsoft.Network"
Unregister-AzProviderFeature -FeatureName AllowApplicationGatewayBasicSku -ProviderNamespace Microsoft.Network
Depending on your requirements and environment, you can create a test Application Gateway using either the Azure portal, Azure PowerShell, or Azure CLI.
'경로 및 정보' 카테고리의 다른 글
| CVE-2024-38819 (0) | 2025.09.08 |
|---|---|
| Proving Grounds: Butch [OSCP Prep 2025 — Practice 14] (0) | 2025.08.31 |
| Intercept HTTPS Traffic When all other Frida Scripts Fail (0) | 2025.06.06 |
| Intercept HTTPS Traffic When all other Frida Scripts Fail (0) | 2025.05.20 |
| Testing for Skype for Business or Lync Client Connectivity and other Skype Scripts (1) | 2025.05.08 |

wtdsoul